User Guide
ManaGease is a desktop app for HR managers to manage full time staff in the workplace, optimized for use via a Command Line Interface (CLI) while still having the benefits of a Graphical User Interface (GUI). If you can type fast, ManaGease can get your employee management tasks done faster than traditional apps.
Our app simplifies and accelerates your experiences of employee information management, payroll management and leave tracking. If this is the first time you are using ManaGease, we recommend that you read our user guide to familiarise with all commands we provide, and learn how to use them from our step-by-step tutorial. You may start with the Quick Start below. Otherwise, jump straight to the Table of Contents or Command Summary section for details of the command you are looking for.
To help you avoid detrimental errors in your experience with ManaGease, we have included some possible outputs and respective error messages for each command. Along the way, there will be some notes and cautions to help you use ManaGease more efficiently.
INDEX.
You can refer to the FAQ section for more information if you encounter some problems while using ManaGease.
If you still have any questions, feel free to contact us at E0968838@u.nus.edu.
We hope you enjoy using ManaGease as much as we enjoyed building it.
Table of Contents
- Table of Contents
- Quick Start
-
Features
- Parameter formats
- Viewing help:
help - Adding an employee:
add - Editing an employee:
edit - Deleting an employee:
delete - Reading an employee’s information:
read - Adding leave to an employee:
addleave - Deleting leave from an employee:
deleteleave - View employee who is on leave:
viewleave - View the calendar of upcoming month:
nm - View the calendar of previous month:
pm - View the calendar of current month:
cm - Adding a deduction to the payroll of an employee:
deduct - Adding a benefit to the payroll of an employee:
benefit - Calculating an employee’s payroll:
payroll - Generating payslips for an employee:
payslip - Marking an employee’s attendance:
mark - View an employee’s attendance report:
attendance - Listing all employees:
list - Locating employees by name:
find - Clearing all entries:
clear - Exiting the program:
exit - Saving the data
- Editing the data file
- FAQ
- Glossary
- Command summary
Quick Start
- Ensure you have Java
11or above installed on your Computer. - Download the latest
ManaGease.jarfrom here - Copy the file to the folder you want to use as the home folder for your ManaGease.
-
Open a command terminal,
cdinto the folder you put the jar file in(i.e.cd DIRECTORY_PATH), and enter thejava -jar ManaGease.jarcommand to run the application.
A GUI similar to the one below should appear in a few seconds. Note how the app contains some sample data.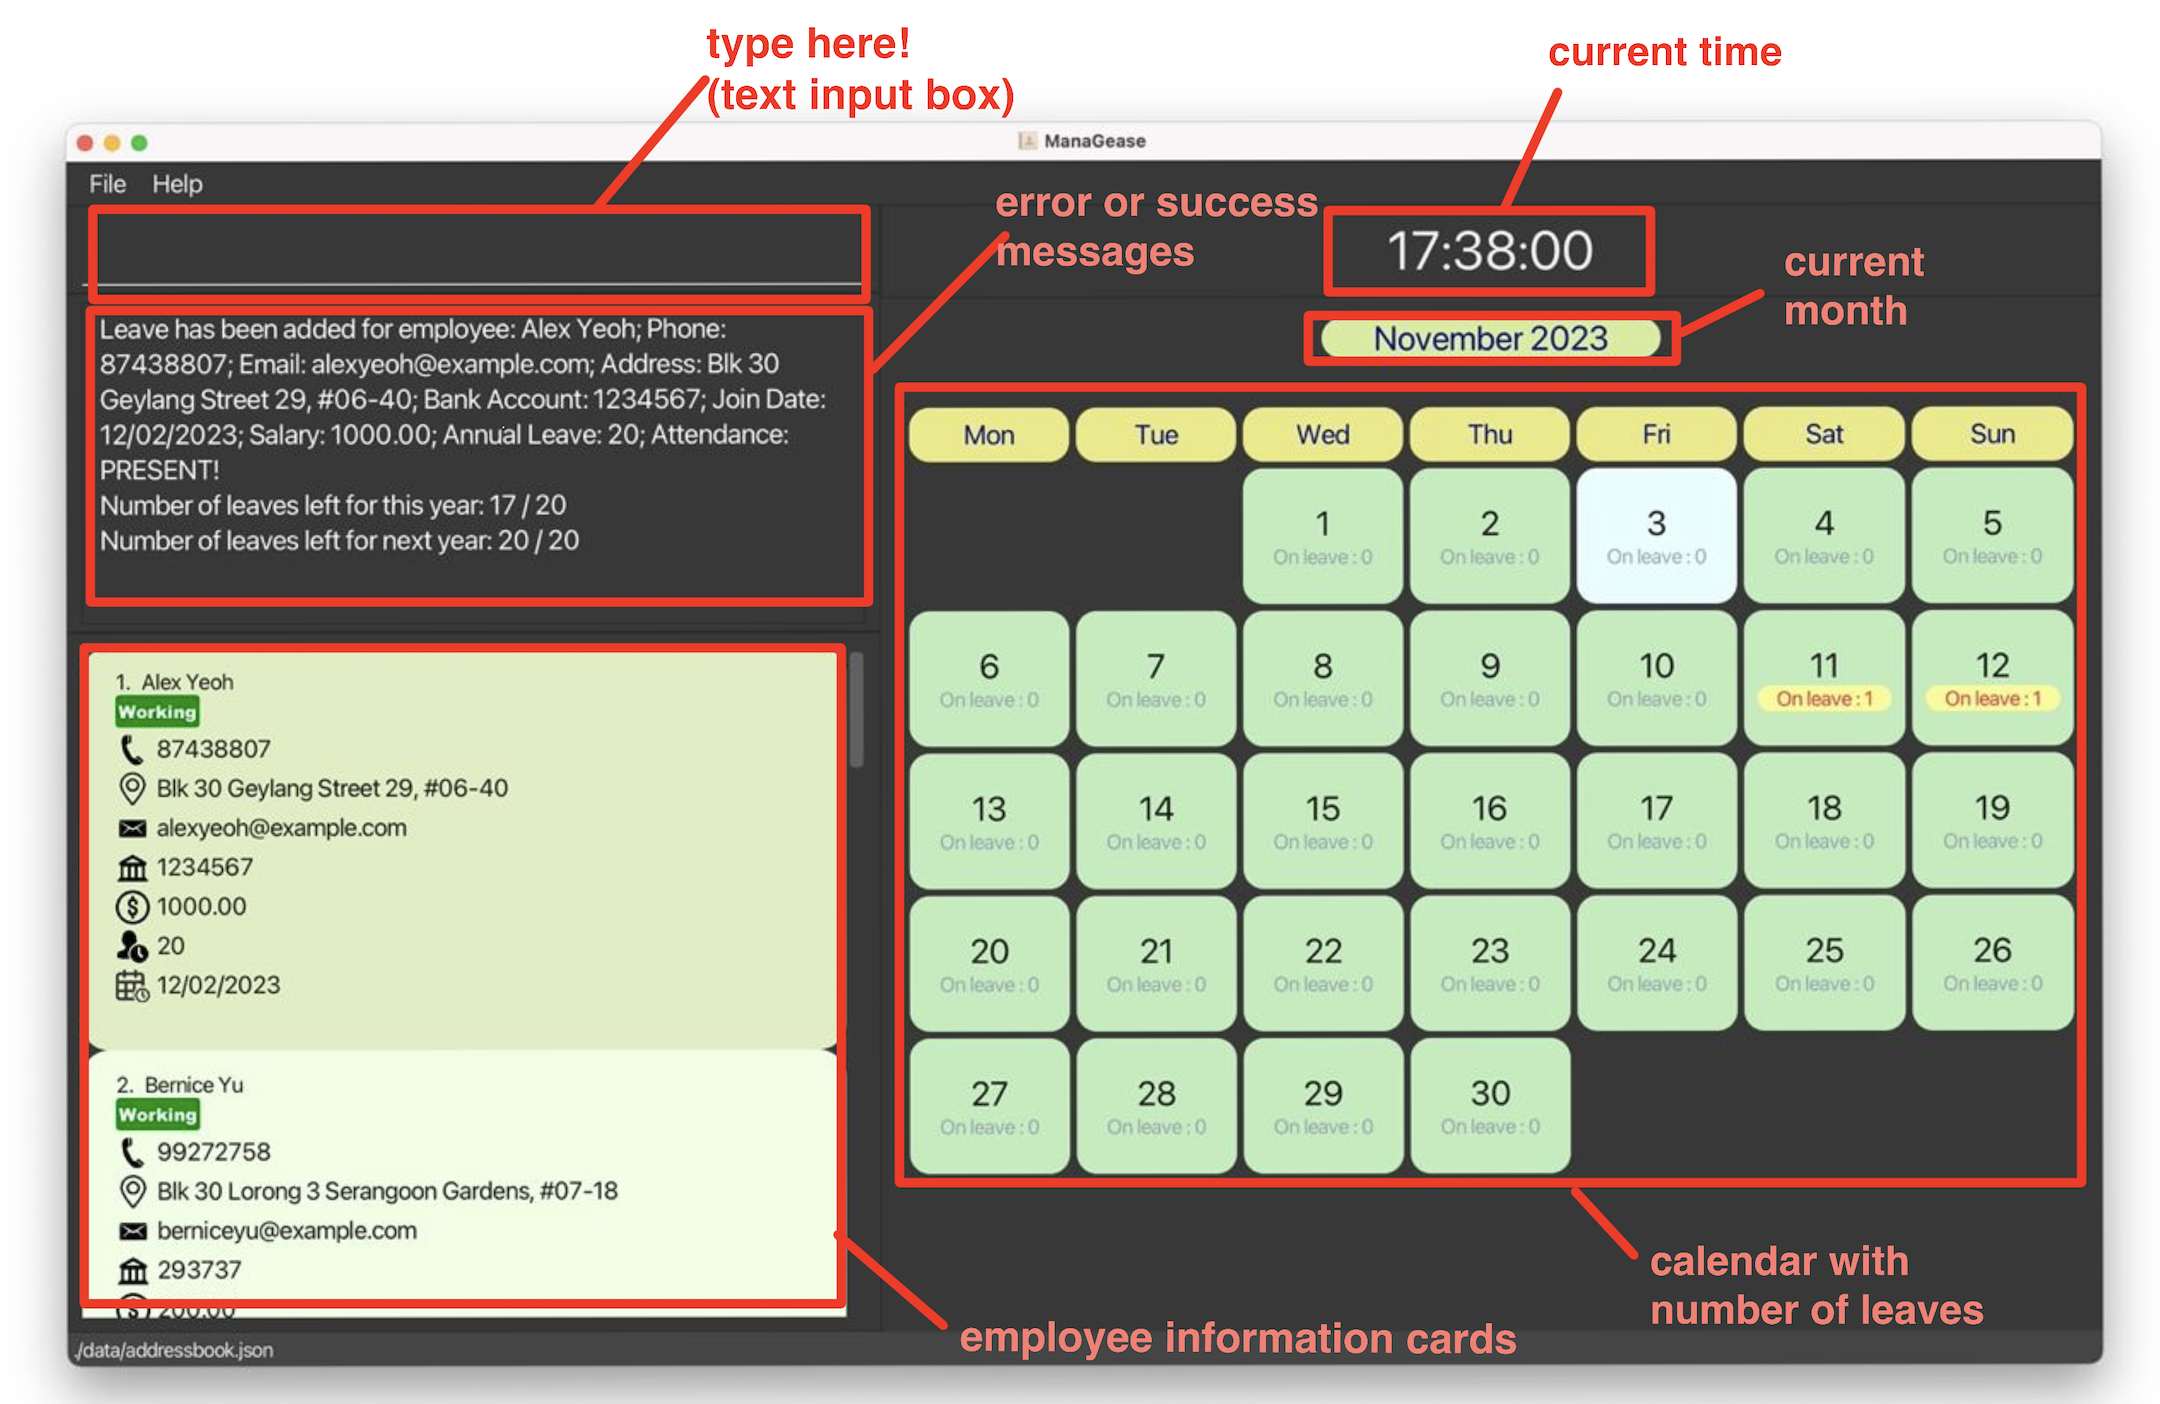
 Note:
The calendar and clock are generated based on the local date and time of your machine. Please verify your machine’s date and time before starting the application!
Employee information is displayed on the person card below:

- For optimised experience, please set the app to full screen.
-
Type the command in the command box and press Enter on your keyboard to execute it. e.g. typing
helpand pressing Enter will open the help window.
Some example commands you can try:-
list: Lists all employees. -
add /n Jane Smith /e jane@email.com /p 12345678 /a 123 Main St /b 123456789 /jd 12/09/2023 /s 1000.00 /l 10: Adds an employee namedJane Smithto ManaGease -
delete 3: Deletes the 3rd employee shown in the current list. -
read 3 /b: Reads the bank account of the 3rd employee shown in the current list. -
edit 2 /n Betsy Crower: Edits the name of the 2nd employee to beBetsy Crower. -
clear: Deletes all employees. -
exit: Exits the app.
-
Refer to Command Summary below for a summary of all commands, and the Features below for details of each command.
- Go back to Table of Contents
Features
- For a quick glance at all the commands and features, please refer to the Command Summary.
![]() Notes about the command format:
Notes about the command format:
-
Words in
UPPER_CASEare the parameters to be supplied by the user.
e.g. inedit INDEX /n NAME,INDEXandNAMEare parameters that can be used asedit 3 /n John Doe. -
Commands, prefixes and most parameters are to be entered in lowercase. You can only enter capitalized letters for parameters of
NAME,EMAILandADDRESS. -
Items in square brackets are optional.
e.g./n NAME [/p PHONE]can be used as/n John Doe /p 98988989or as/n John Doe. -
Parameters can be in any order.
e.g. if the command specifies/n NAME /p PHONE,/p PHONE /n NAMEis also acceptable. -
Extraneous parameters for commands that do not take in parameters (such as
help,list,exitandclear) will be ignored.
e.g. if the command specifieshelp 123, it will be interpreted ashelp. -
If you are using a PDF version of this document, be careful when copying and pasting commands that span multiple lines as space characters surrounding line-breaks may be omitted when copied over to the application.
Parameter formats
- All parameters provided must be in the correct format.
| Prefix | Parameter | Format | Example |
|---|---|---|---|
/n |
NAME |
non-empty and non-blank alphanumeric string | /n jibtaf |
/p |
PHONE |
string containing at least 3 integers | /p 98988989 |
/e |
EMAIL |
local-part@domain 1. The local-part should only contain alphanumeric characters and +, _, ., -. It may not start or end with any special characters.2. This is followed by a ‘@’ and then a domain name. The domain name is made up of domain labels separated by periods. The domain name must: - end with a domain label at least 2 characters long - have each domain label start and end with alphanumeric characters - have each domain label consist of alphanumeric characters, separated only by hyphens, if any. |
/e john_doe@u.nus.edu |
/a |
ADDRESS |
non-empty and non-blank alphanumeric string | /a PGPR, Singapore 118420 |
/b |
BANK_ACCOUNT |
string containing 5 to 17 integers, inclusive | /b 1029384756 |
/jd |
JOIN_DATE |
date in the form of DD/MM/YYYY, and must be valid (e.g., 29/02/2023 and 31/09/2023 are not valid dates) | /jd 20/04/2018 |
/s |
SALARY |
numeric digits in 2 decimal places, without any sign for currencies | /s 2000.00 |
/v |
VALUE |
numeric digits in 2 decimal places, without any sign for currencies | /v 150.00 |
/l |
ANNUAL_LEAVE |
numeric digits | /l 25 |
/from |
FROM_DATE |
date in the form of DD/MM/YYYY, and must be valid (e.g., 29/02/2023 and 31/09/2023 are not valid dates) | /from 20/04/2018 |
/to |
TO_DATE |
date in the form of DD/MM/YYYY, and must be valid (e.g., 29/02/2023 and 31/09/2023 are not valid dates) | /to 20/04/2018 |
/on |
DATE |
date in the form of DD/MM/YYYY, and must be valid (e.g., 29/02/2023 and 31/09/2023 are not valid dates) | /on 20/04/2018 |
/t |
MONTH_YEAR_DATE |
date in the form of DD/MM/YYYY, and must be valid (e.g., 29/02/2023 and 31/09/2023 are not valid dates) | /t 20/04/2018 |
/r |
REASON |
case-insensitive words from the following list: 1. cpf (means EMPLOYEE_CPF_DEDUCTION)2. absence (means ABSENCE)3. no pay (means NO_PAY_LEAVE)4. bonus (means ANNUAL_BONUS)5. transport (means TRANSPORT_ALLOWANCE) |
/r no pay |
/at |
ATTENDANCE_TYPE |
case-insensitive words from the following list: 1. present (means PRESENT)2. late (means LATE)3. absent (means ABSENT) |
/at late |
Viewing help: help
What it does:
Shows a message explaining how to access the help page.
Command Format:
help
Output:
-
A new window will pop up with the link to the help page.

-
Go back to Table of Contents
Adding an employee: add
What it does
This feature allows users to add a new employee to the ManaGease app, creating a profile with essential details.
Command format:
add /n NAME /e EMAIL /p PHONE /a ADDRESS /b BANK_ACCOUNT /jd JOIN_DATE
    /s SALARY /l ANNUAL_LEAVE
NAME parameter is case-sensitive. E.g., If you have an employee named John Doe, you are advised not to add another employee named john doe. This will be fixed by the next update.
Example:
-
add /n Jane Smith /e jane@email.com /p 12345678 /a 123 Main St /b 123456789
/jd 12/09/2023 /s 1000.00 /l 10
adds an employee namedJane Smithwith given information to ManaGease.
Output:
- ManaGease should display a confirmation message indicating that the employee has been successfully added to the database.
- The employee’s profile should be updated with the provided information.


Possible Error Output:
-
If prefix used is not defined, an error message will appear.
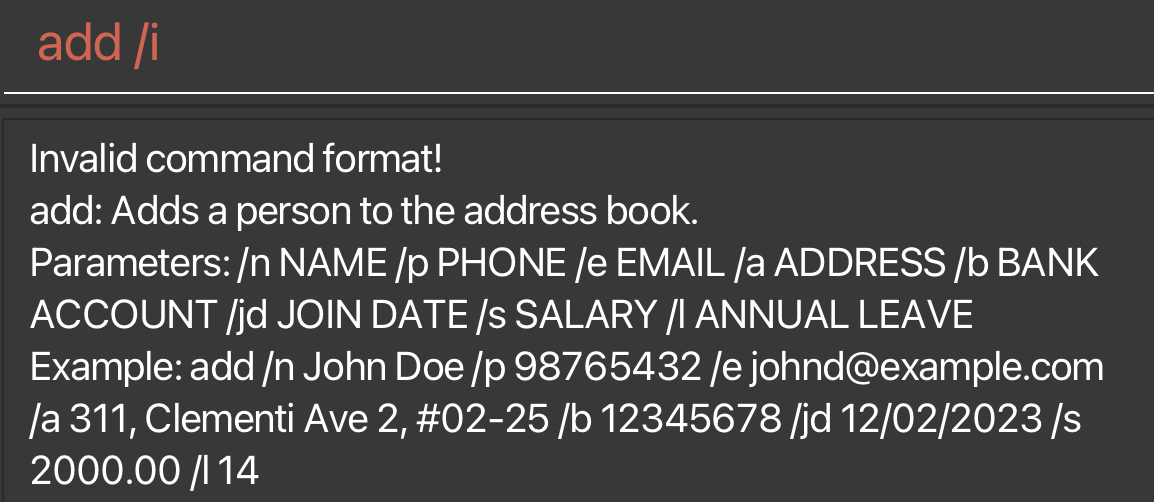
-
If a new employee is added with the same name, email, phone number, address, bank account, join date, salary and number of leaves as an existing employee, an error message will appear.

-
Go back to Table of Contents
Editing an employee: edit
What it does
Edits an existing employee in the address book.
Command Format:
edit INDEX [/n NAME] [/e EMAIL] [/p PHONE] [/a ADDRESS] [/b BANK_ACCOUNT] [/jd JOIN_DATE] [/s SALARY] [/l ANNUAL_LEAVE]
- Edits the employee at the specified
INDEX. - The
INDEXrefers to the index number shown in the displayed employee list. - The
INDEXmust be a positive integer, and must be within the range of the list (Total number of employees in the current list displayed).
INDEX.
- At least one of the optional fields must be provided.
- Existing values will be updated to the input values.
Examples:
-
edit 1 /p 91234567 /e johndoe@example.comedits the phone number and email address of the 1st employee to be91234567andjohndoe@example.comrespectively. -
edit 2 /n Betsy Croweredits the name of the 2nd employee to beBetsy Crowerand clears all existing tags.
Output:
- ManaGease should display the information of the updated employee.
- The employee’s profile should be updated with the provided information.

Possible Error Output:
- If the index is not within the numbers in the list, the app should display
The employee index provided is invalid. - If the command is incorrect, the app should display the following message.

- If you did not specify any field to edit, the app should display the following message.

-
If you try to edit the field without any change, i.e., the existing field is exactly the same as the one you want to change into, the app should display the following message.


- Go back to Table of Contents
Deleting an employee: delete
What it does
This feature allows users to delete an employee based on index or name.
Command Format
delete INDEX or delete /n NAME
- Deletes the employee at the specified
INDEXor with the nameNAME. - The
INDEXrefers to the index number shown in the displayed employee list. - The
INDEXmust be a positive integer, and must be within the range of the list (Total number of employees in the current list displayed).
INDEX.
- The
NAMEmust be in the correct format.
delete /n FULLNAME of any of the employee will still return a list of these employees instead of deleting the employee that matches the full name.
Examples:
-
listfollowed bydelete 2deletes the 2nd employee in the employee directory. -
find Betsyfollowed bydelete 1deletes the 1st employee in the results of thefindcommand. -
delete /n Betsywill delete the employee with the name ‘Betsy’ if there is only one such employee with this name. If there is no such employee, there will be an error message displayed. Otherwise, it will return you a list of employees with the name ‘Betsy’ and you will have to follow up with adelete INDEXcommand to delete the ‘Betsy’ that you want using the index displayed in the list.
Output:
- If the index is valid or there is only one employee in the list, whose name contains the keyword, ManaGease should display a confirmation message indicating that the employee information has been successfully deleted.
- The employee’s list should be updated by removing the employee.

Possible Error Output:
-
If there are multiple employees with the same name, all the matching employees would be displayed. Hence, ManaGease will return “Here is the list of the matching employees:”

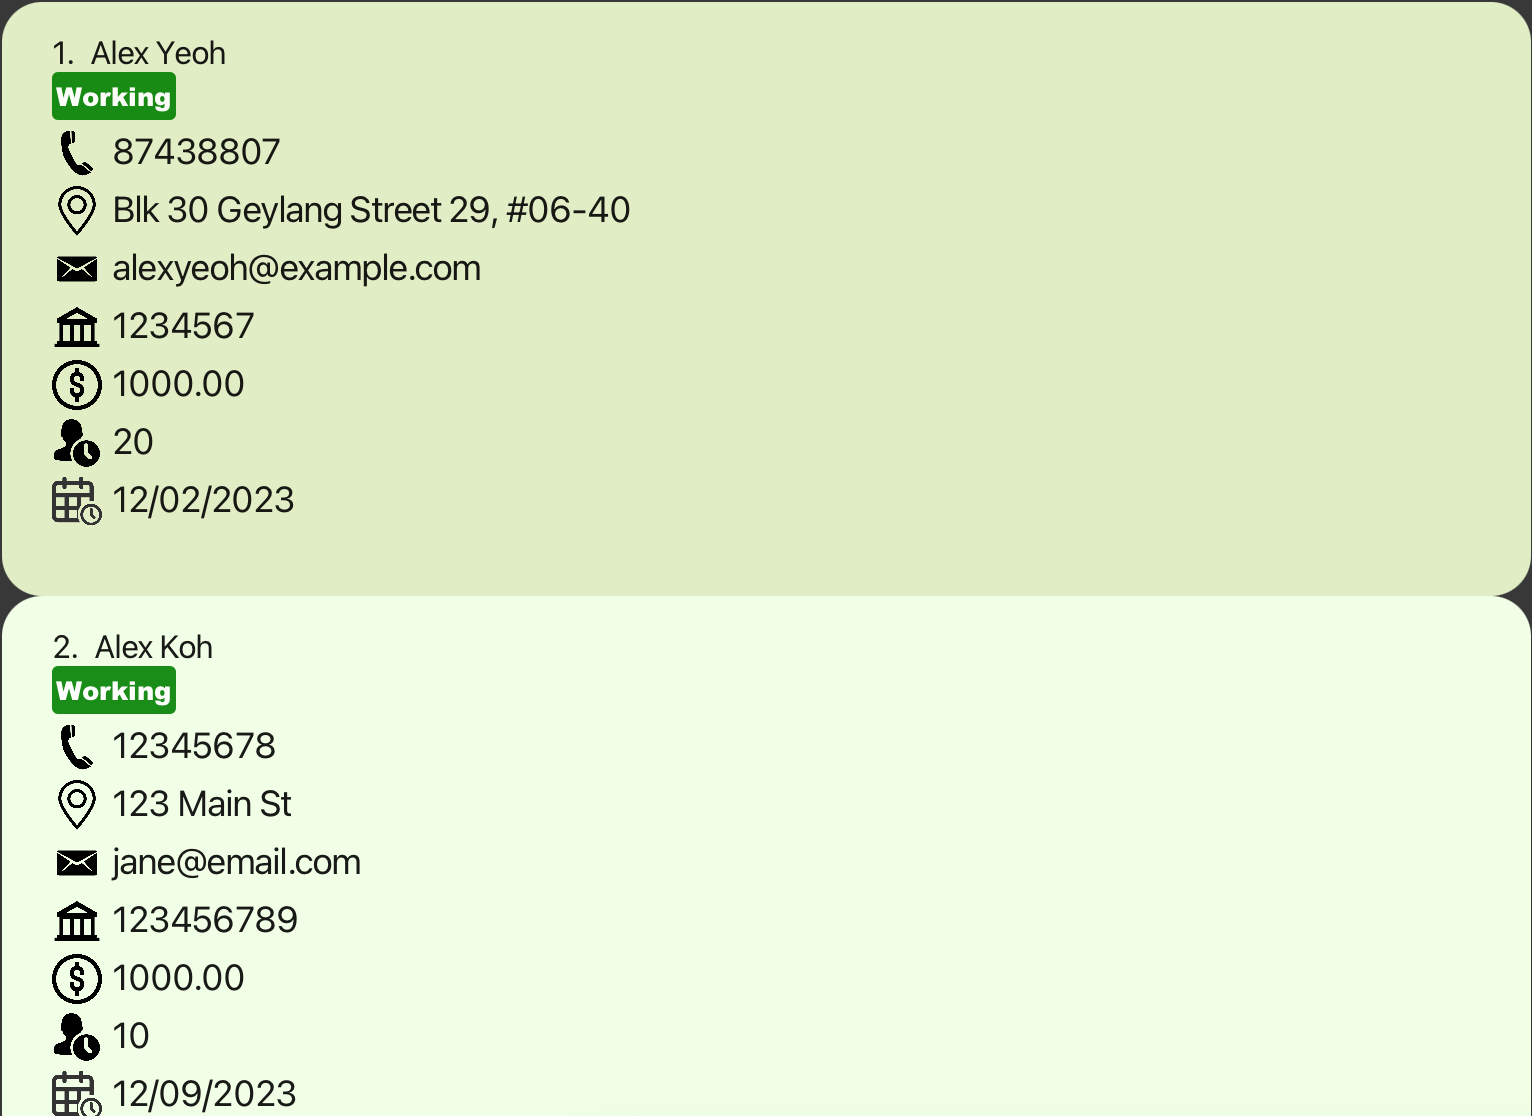
-
Go back to Table of Contents
Reading an employee’s information: read
What it does
This feature allows users to view specific information (except the name) about an employee.
Command Format
read INDEX PREFIX
- Reads the employee’s information specified by the
PREFIXat the specifiedINDEX. - The
INDEXrefers to the index number shown in the displayed employee list. - The
INDEXmust be a positive integer, and must be within the range of the list (Total number of employees in the current list displayed).
INDEX.
Examples:
-
read 1 /areads the address of the first employee in the most recently displayed list.
read x /l (where x is the index of the employee for whom you intend to check) to check the leave balance/leave taken to avoid errors before adding or deleting leaves.
Output:
- ManaGease should display the information of the employee specified by the
INDEXandPREFIX, if the input is valid.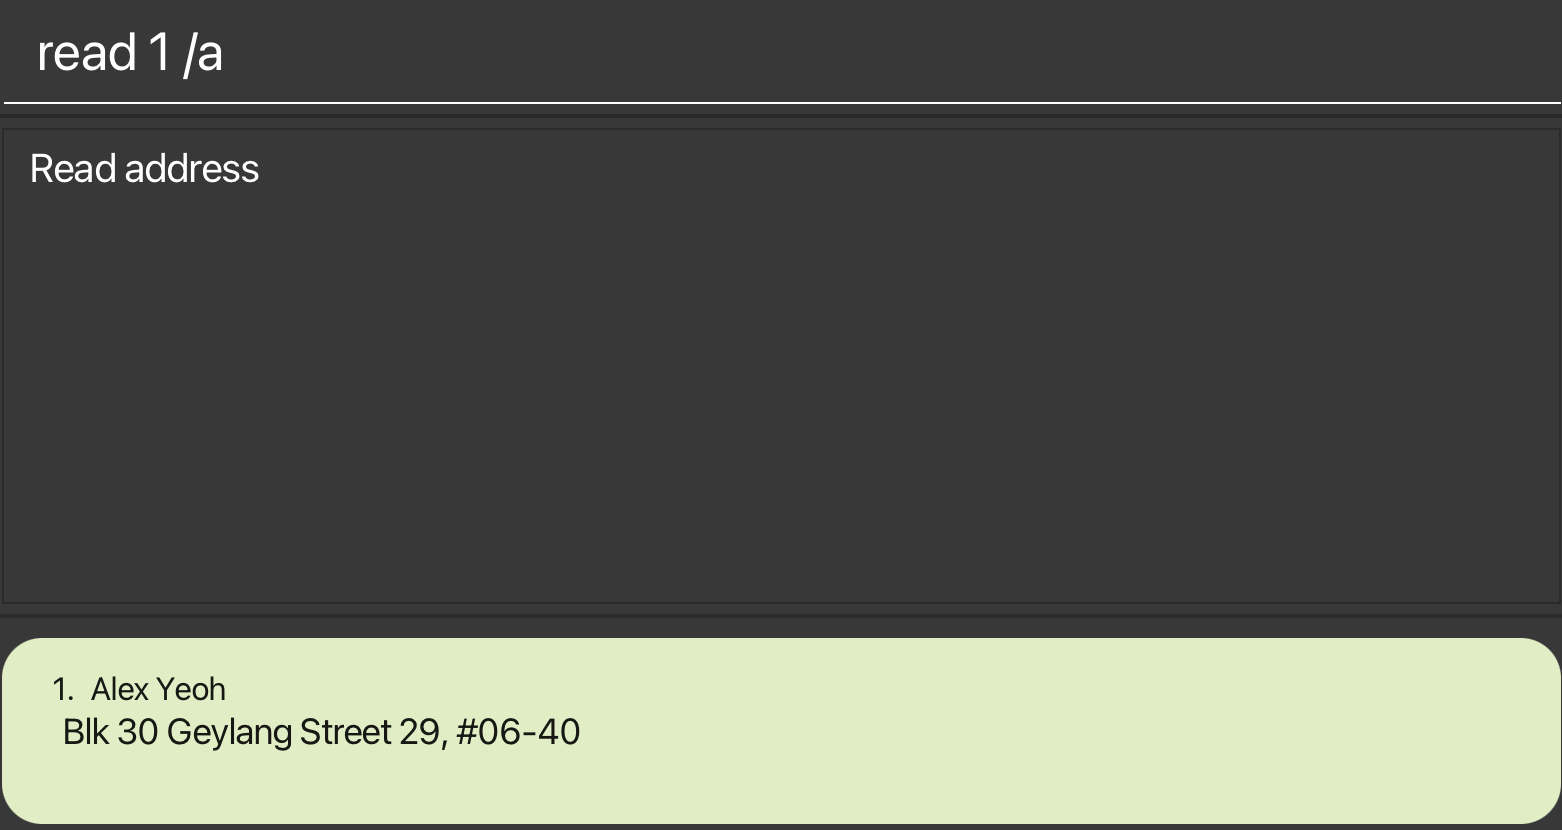
Possible Error Output:
-
If the index is not within the numbers in the list, the app should display
The employee index provided is invalid. - If the command is incorrect, the app should display the following message.

-
If the
PREFIXprovided is not valid, the app should displayThe field to read provided is invalid. Please refer to the parameter formats for a list of all supported fields. - Go back to Table of Contents
Adding leave to an employee: addleave
What it does
This feature allows users to add leave(s) to an employee.
Command Format
addleave INDEX /on DATE or addleave INDEX /from DATE /to DATE
- Adds leave to the employee specified by the
INDEX. - You have the flexibility to add leave for a single day or multiple consecutive days.
- You can add leave for the current year and the upcoming year, but you won’t be able to add leave for past dates.
attendance command to see the number of days of leave the employee has been on.
- The
INDEXrefers to the index number shown in the displayed employee list. - The
INDEXmust be a positive integer, and must be within the range of the list (Total number of employees in the current list displayed).
INDEX.
- The
DATEmust be inDD/MM/YYYYformat, e.g.01/01/2024. - For adding in multiple days of leave, the second
DATEmust be after the firstDATE.
Before adding leave, you can utilize the command
read x /l (where x is the index of the employee for whom you intend to add leave) to check the leave balance. This ensures you avoid errors due to insufficient leave balance for the specified employee.
Examples:
-
addleave 3 /on 01/01/2024adds a single day of leave of01/01/2024to the third employee in the most recently displayed list. -
addleave 3 /from 01/01/2024 /to 04/01/2024adds in multiple days of leave to the third employee in the most recently displayed list from01/01/2024to04/01/2024, inclusive.
Output:
- If there are no errors, the app should display the following success message that the leave(s) has been added and display the number of leave left for the current year and the following year.
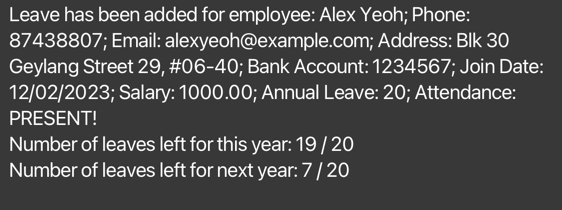
- Note that the
ANNUAL_LEAVEfield displayed on the employee card remains unchanged, as it represents the promised number of annual leave.
Possible Error Output:
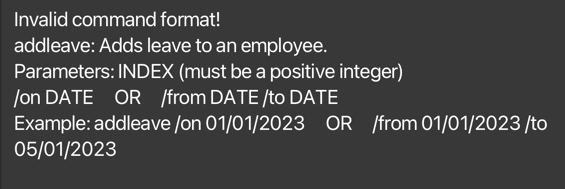
-
If the index is not within the numbers in the list, or the format of the command is incorrect, the app should display the following error message.
-
If the
DATEprovided is not in the correct format, the app should display the following error message.
-
If the
DATEhas already been added to the employee, the app should display the following error message.
-
If the second
DATEis before the firstDATEwhen adding in multiple days of leave, the app should display the following error message.
-
If any of the
DATEis not in the current year or next year, or if the total number of days of leave added to an employee exceeds the total days of leave allowed for an employee, the app should display the following error message.
-
Go back to Table of Contents
Deleting leave from an employee: deleteleave
What it does
This feature allows users to delete leave(s) from an employee.
Command Format
deleteleave INDEX /on DATE or deleteleave INDEX /from DATE /to DATE
- Deletes leave from the employee specified by the
INDEX. - You have the flexibility to delete leave for a single day or multiple consecutive days.
- The
INDEXrefers to the index number shown in the displayed employee list. - The
INDEXmust be a positive integer, and must be within the range of the list (Total number of employees in the current list displayed).
INDEX.
- The
DATEmust be inDD/MM/YYYYformat, e.g.01/01/2024. - For deleting multiple days of leave, the second
DATEmust be after the firstDATE.
Before deleting leave, you can utilize the command
read x /l (where x is the index of the employee for whom you intend to delete leave) to verify that the leave taken matches the leave you wish to delete. This ensures you avoid errors due to insufficient leave balance for the specified employee.
Examples:
-
deleteleave 3 /on 01/01/2024deletes a single day of leave of01/01/2024from the third employee in the most recently displayed list. -
deleteleave 3 /from 01/01/2024 /to 04/01/2024deletes multiple days of leave from the third employee in the most recently displayed list from01/01/2024to04/01/2024, inclusive.
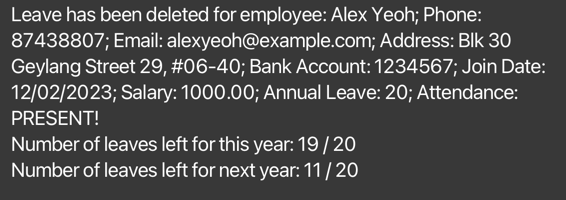
Output:
- If there are no errors, the app should display the following success message that the leave(s) has been added and display the number of leave left for the current year and the following year.
Possible Error Output:
-
If the index is not within the numbers in the list, or the format of the command is incorrect, the app should display the following error message.

-
If the
DATEprovided is not in the correct format, the app should display the following error message.
-
If the
DATEhas not been added to the employee, the app should display the following error message.
-
If the second
DATEis before the firstDATEwhen adding in multiple days of leave, the app should display the following error message.
-
Go back to Table of Contents
View employee who is on leave: viewleave
What it does
This feature allows users to view employees who are on leave on a specific date.
Command Format
viewleave /on DATE
-
Views employees who are on leave on a specific DATE (must be a single date).
-
The
DATEmust be inDD/MM/YYYYformat, e.g.01/01/2024.
Examples:
-
viewleave /on 01/01/2024view employee who is on leave on 01/01/2024.
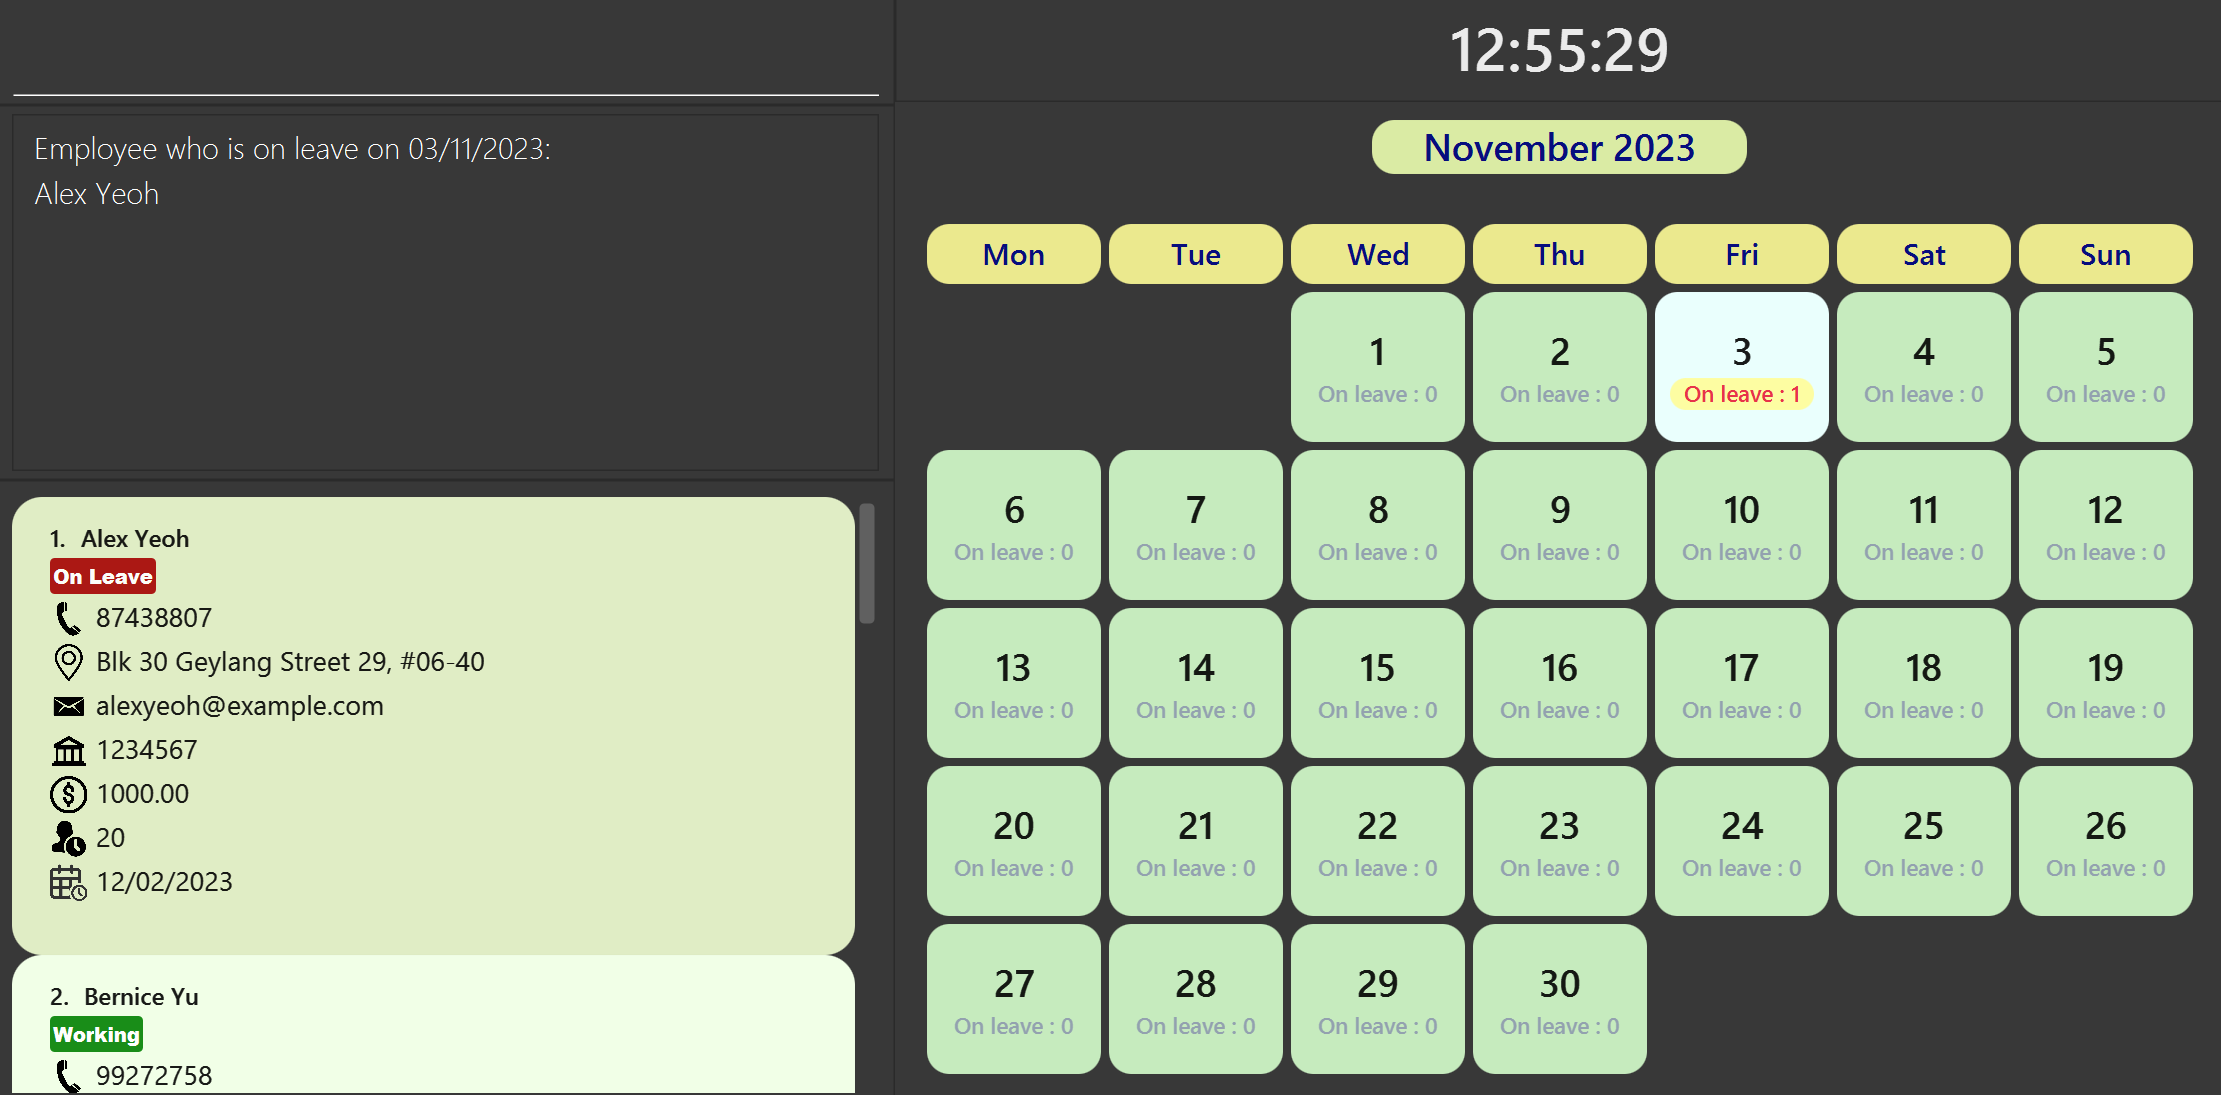
Output:
- If the command executes successfully, the app should display the employee who is on leave on the specific date.
Possible Error Output:
- If the command is incorrect, the app should display an error message indicating the command format is invalid followed by the command usage message.
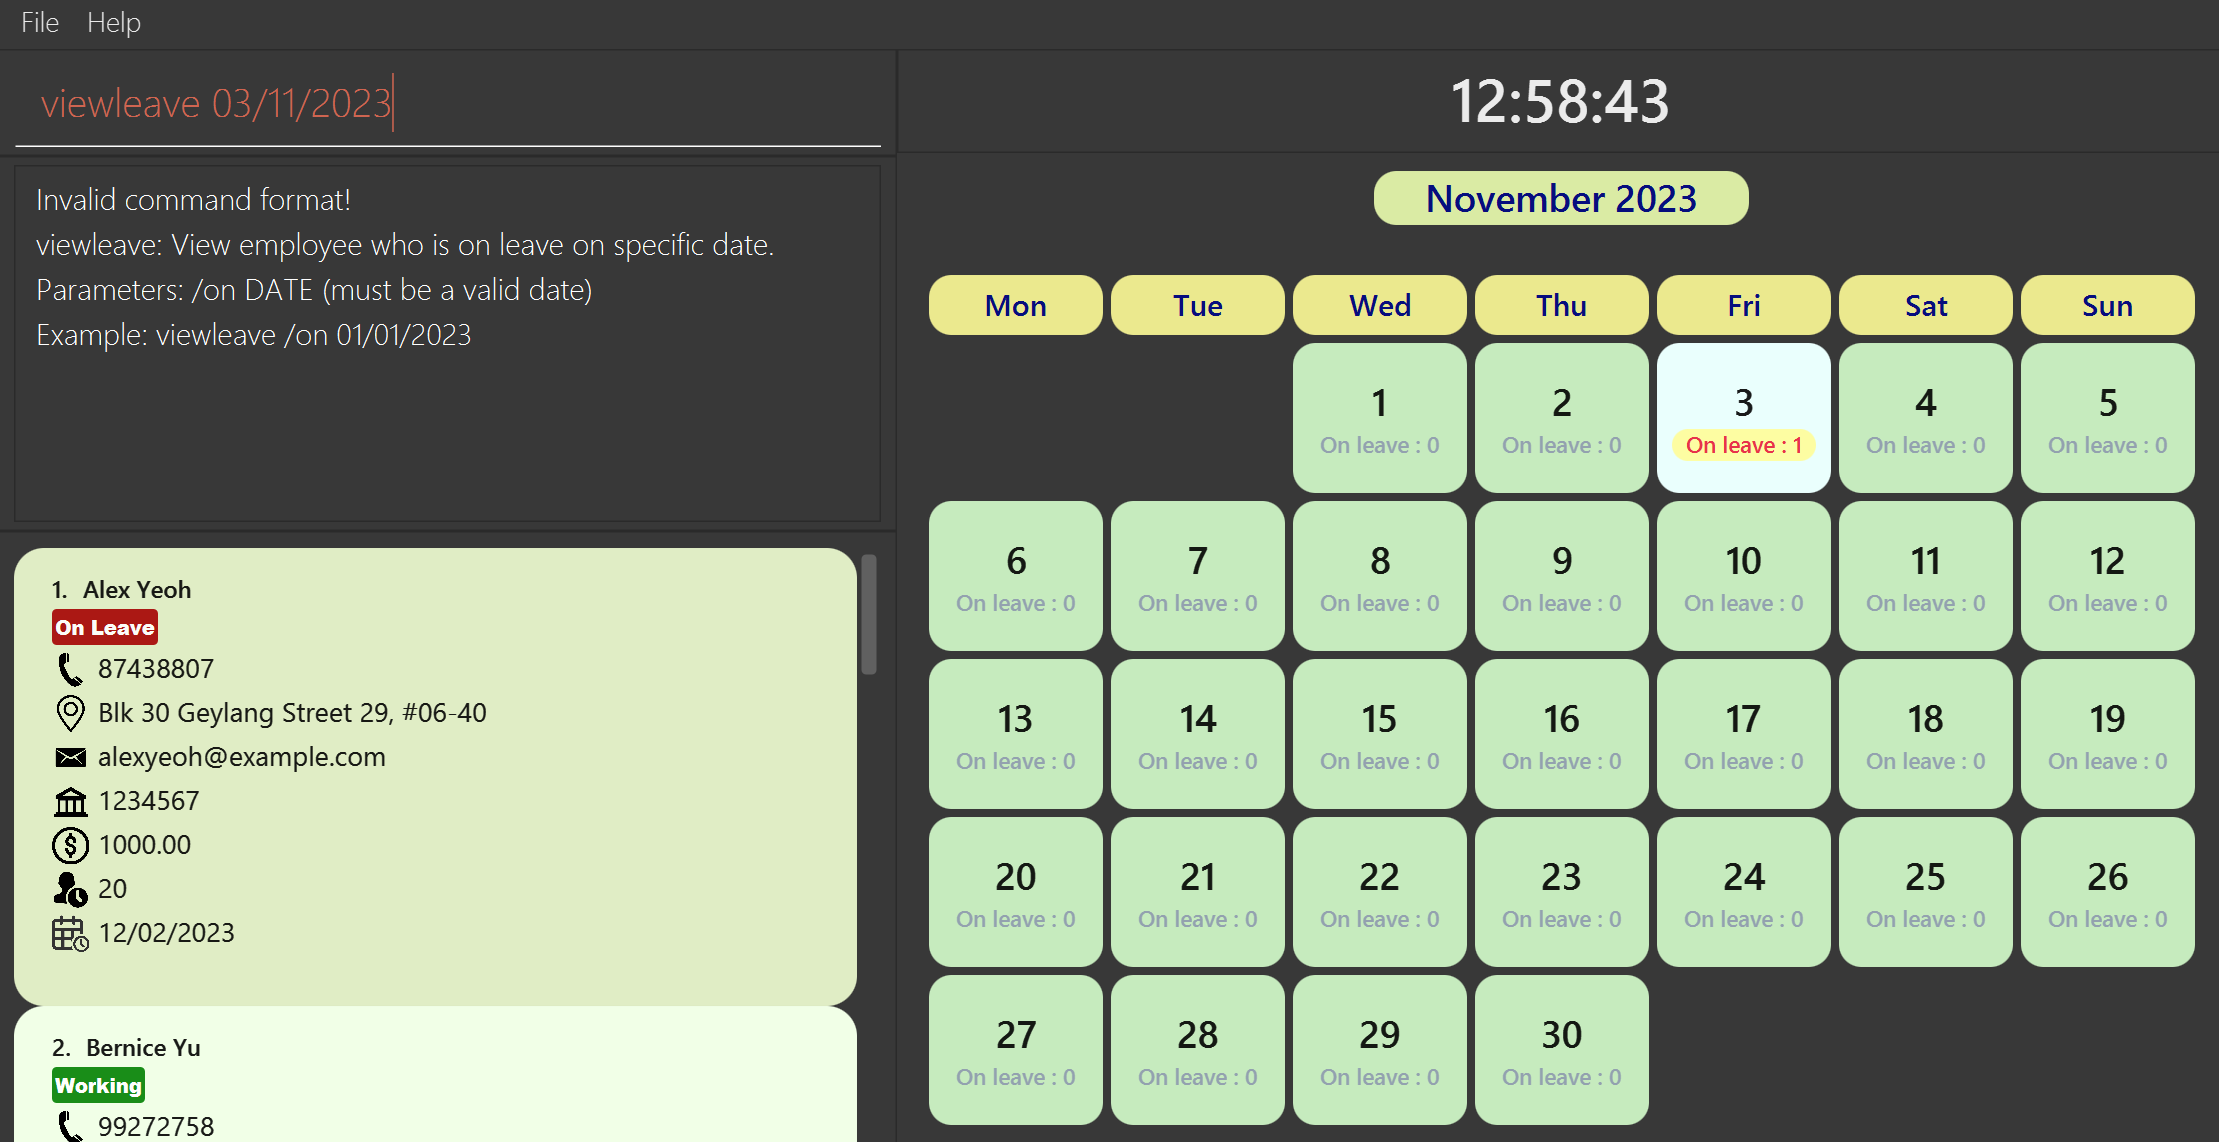
- If the
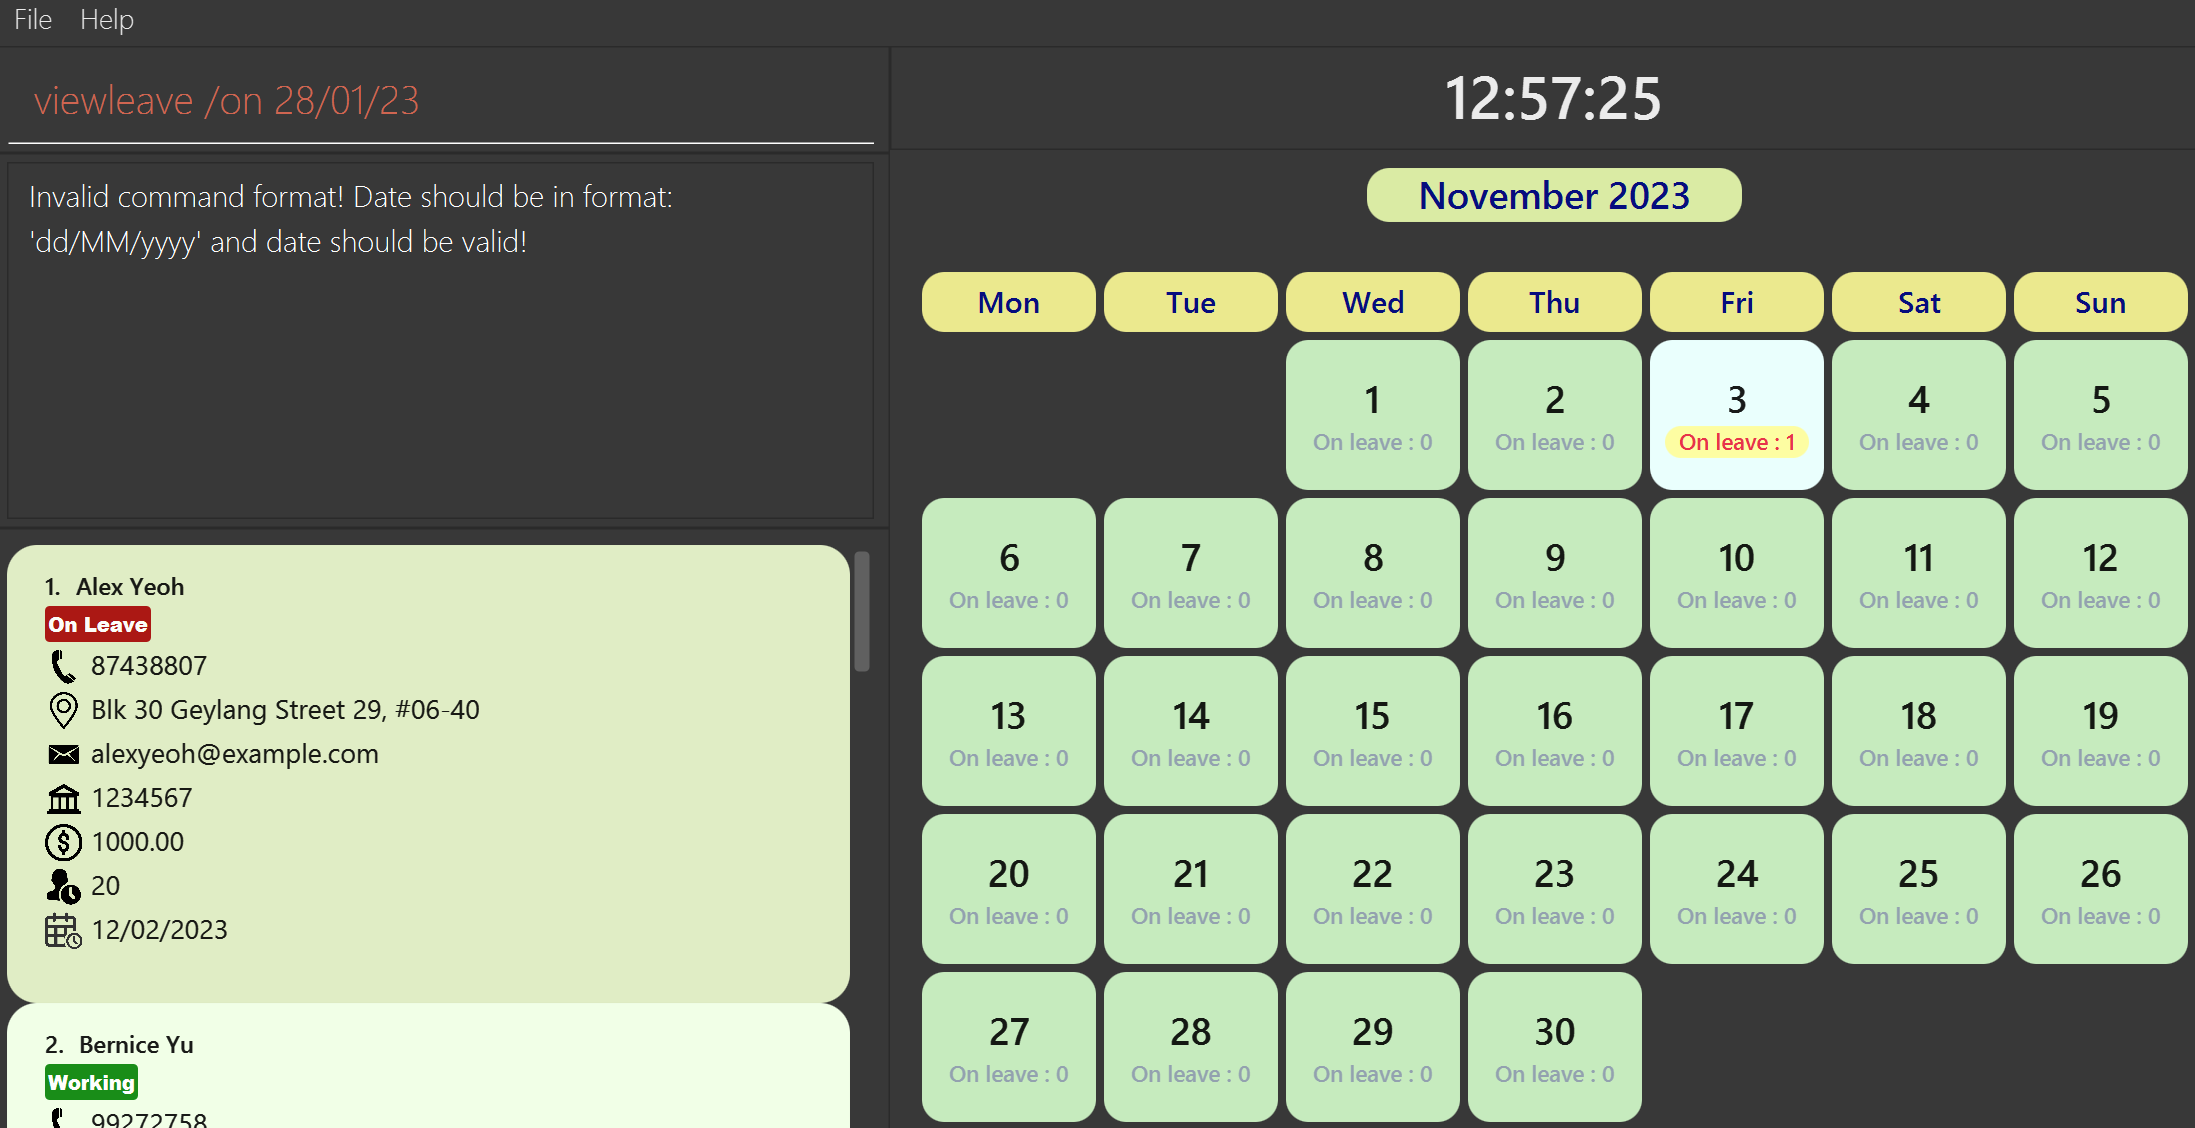
DATEprovided is not in the correct format, the app should display an error message indicating the date format is invalid and provide guidance on the correct date format.’
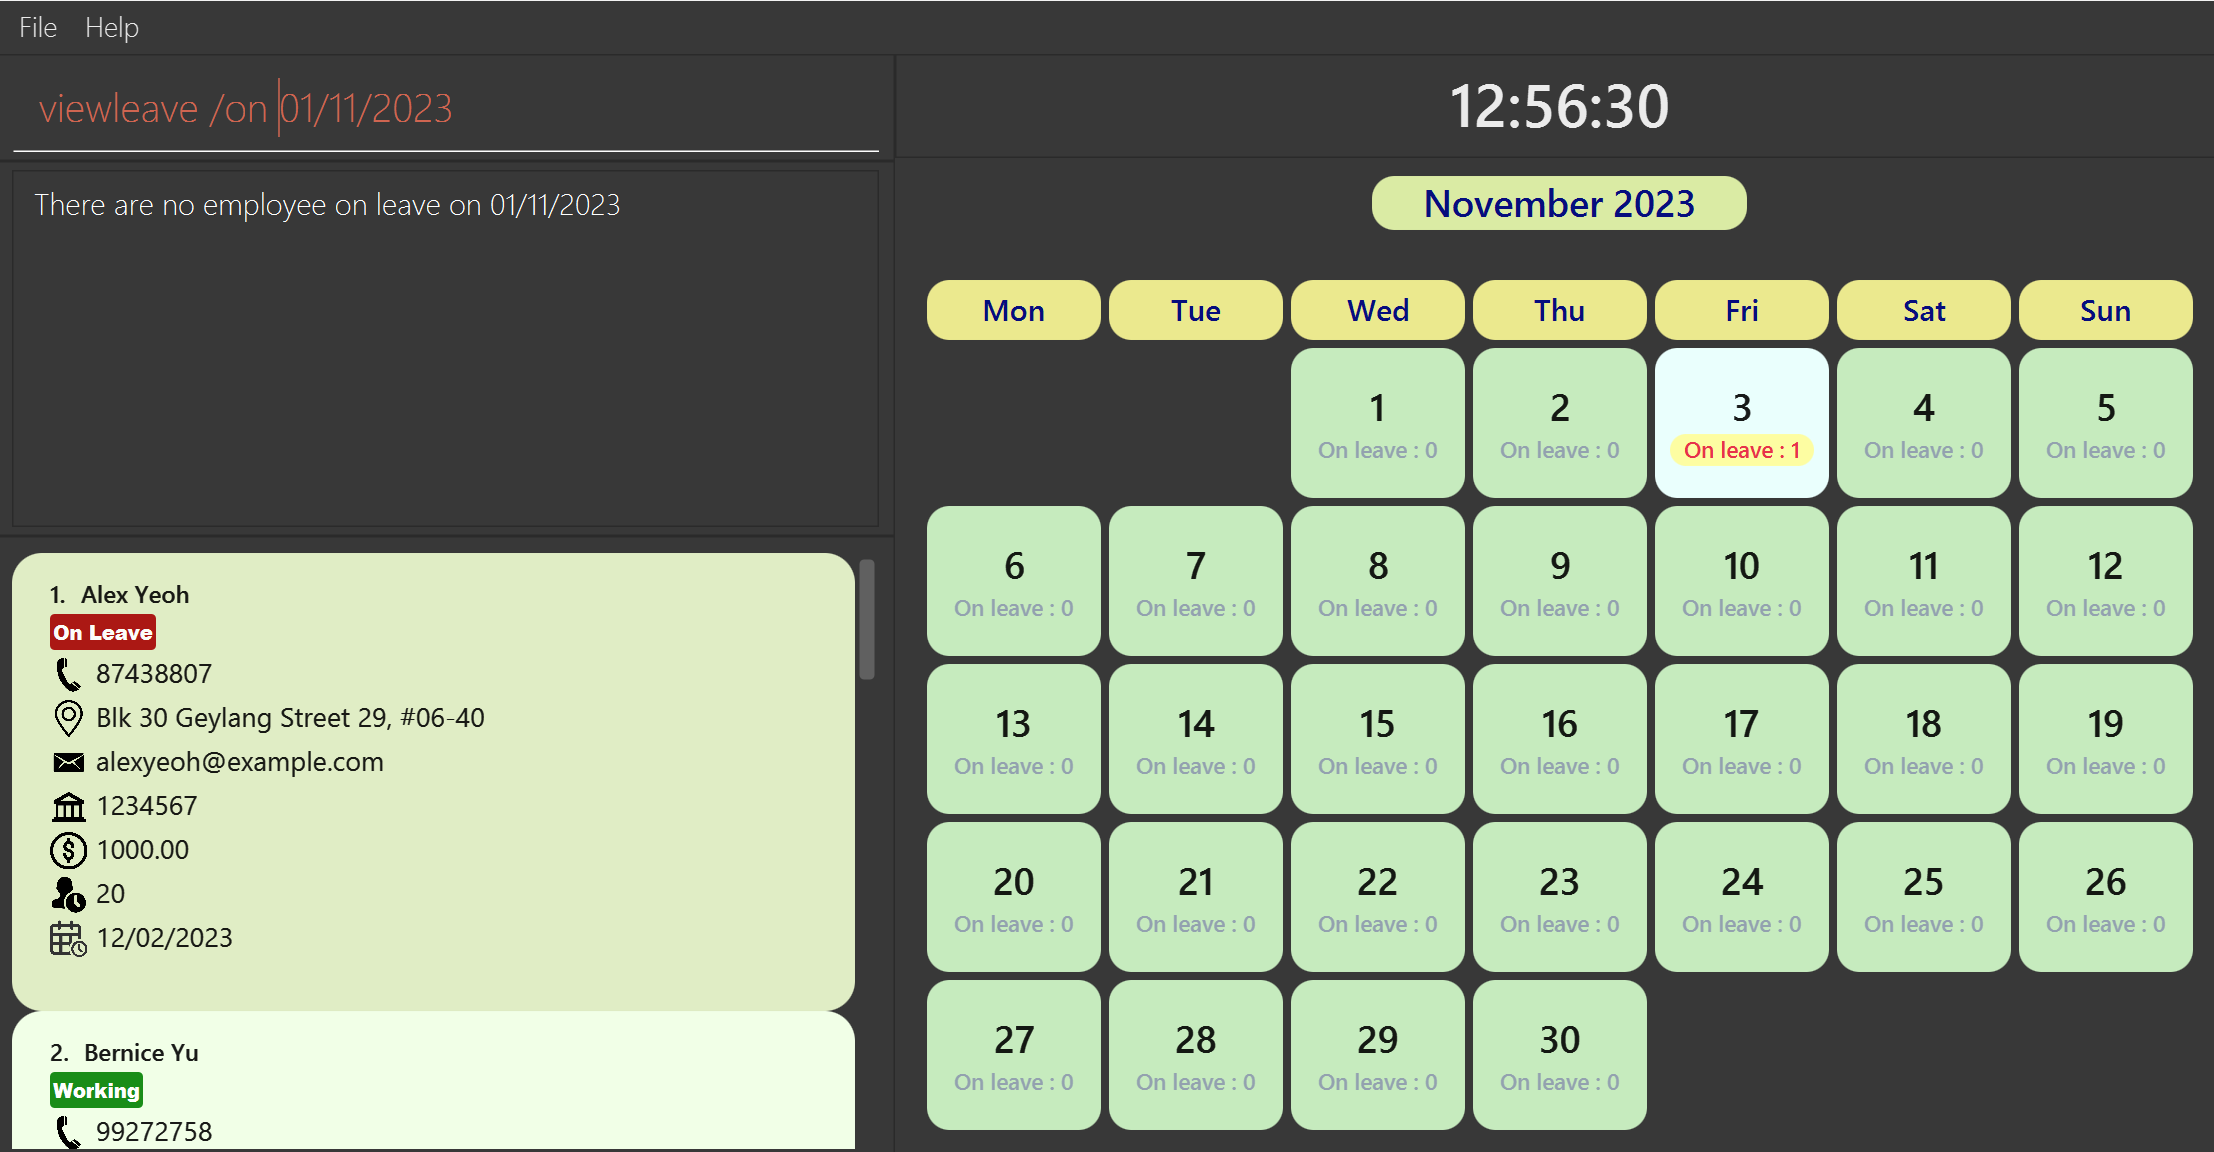
- If there is no employee on leave on the specific date, the app should display an error message indicating there is no employee on leave on the specific date.
- Go back to Table of Contents
View the calendar of upcoming month: nm
What it does
This feature allows users to view the calendar of the upcoming month on the app.
Command Format
nm
- Go back to Table of Contents
View the calendar of previous month: pm
What it does
This feature allows users to view the calendar of the previous month on the app.
Command Format
pm
- Go back to Table of Contents
View the calendar of current month: cm
What it does
This feature allows users to view the calendar of the current month on the app.
Command Format
cm
- Go back to Table of Contents
Adding a deduction to the payroll of an employee: deduct
What it does
This feature allows users to add a deduction to the payroll of an employee.
Command Format
deduct INDEX /v VALUE /r REASON or deduct /n NAME /v VALUE /r REASON
- Adds a deduction with given
VALUEandREASONto the employee specified by theINDEXorNAME. - The
INDEXrefers to the index number shown in the displayed employee list. - The
INDEXmust be a positive integer, and must be within the range of the list (Total number of employees in the current list displayed).
INDEX.
- The
VALUEmust be a positive number, and must be in the format of 2 decimal places. - The
REASONmust be a non-empty and non-blank string. It must take one of the three values:absence,cpforno pay, which stands forAbsence from work,Employee CPF deductionandNo pay leaverespectively. - The
REASONis case-insensitive. - The
NAMEmust be in the correct format.
Examples:
-
deduct 3 /v 100.00 /r absenceadds a deduction of $100.00 for being absent from work to the third employee in the most recently displayed list. -
deduct /n John Doe /v 100.00 /r cpfadds a deduction of $100.00 for employee CPF deduction to the employee named John Doe.
Output:
- ManaGease should display the deduction information of the employee specified, including the newly added deduction, if the input is valid.

Possible Error Output:
- If the index is not within the numbers in the list, the app should display
The employee index provided is invalid. - If the command is incorrect, the app should display the following message.
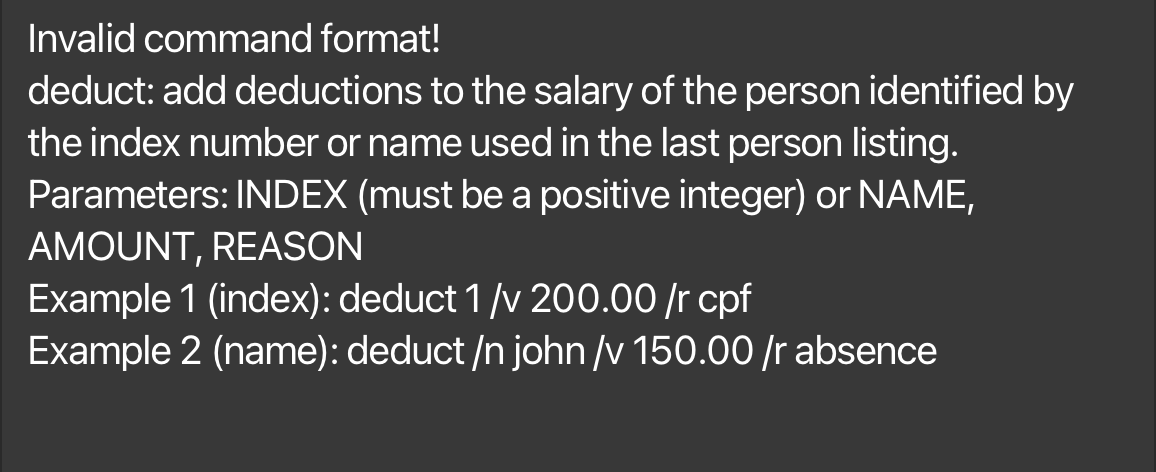
- If the
VALUEprovided is not in the correct format, the app should display the following message. Here it says that
 Payment should only contain unmerical digits.. This is because theVALUEfield refers to the amount of money to be deducted from the employee’s salary, which is aPayment. This also applies to theVALUEfield in thebenefitcommand and theSALARYfield in theaddandeditcommand. - If the
REASONfield is missing, the app should display the following message.
- If the
REASONprovided is not supported (i.e. not one of the five reasons in the parameter formats), the app should display the following message.
-
If the
REASONprovided is not a valid one for a deduction, the app should display the following message.
- Go back to Table of Contents
Adding a benefit to the payroll of an employee: benefit
What it does
This feature allows users to add a benefit to the payroll of an employee.
Command Format
benefit INDEX /v VALUE /r REASON or benefit /n NAME /v VALUE /r REASON
- Adds a benefit with given
VALUEandREASONto the employee specified by theINDEXorNAME. - The
INDEXrefers to the index number shown in the displayed employee list. - The
INDEXmust be a positive integer, and must be within the range of the list (Total number of employees in the current list displayed).
INDEX.
- The
VALUEmust be a positive number, and must be in the format of 2 decimal places. - The
REASONmust be a non-empty and non-blank string. It must take one of the two values:bonusortransport, which stands forAnnual bonusandTransport allowancerespectively. - The
REASONis case-insensitive. - The
NAMEmust be in the correct format.
Examples:
-
benefit 3 /v 1000.00 /r bonusadds a benefit of $1000.00 for annual bonus to the third employee in the most recently displayed list. -
benefit /n John Doe /v 200.00 /r transportadds a benefit of $200.00 for transport allowance to the employee named John Doe.
Output:
- ManaGease should display the benefit information of the employee specified, including the newly added benefit, if the input is valid.

Possible Error Output:
- If the index is not within the numbers in the list, the app should display
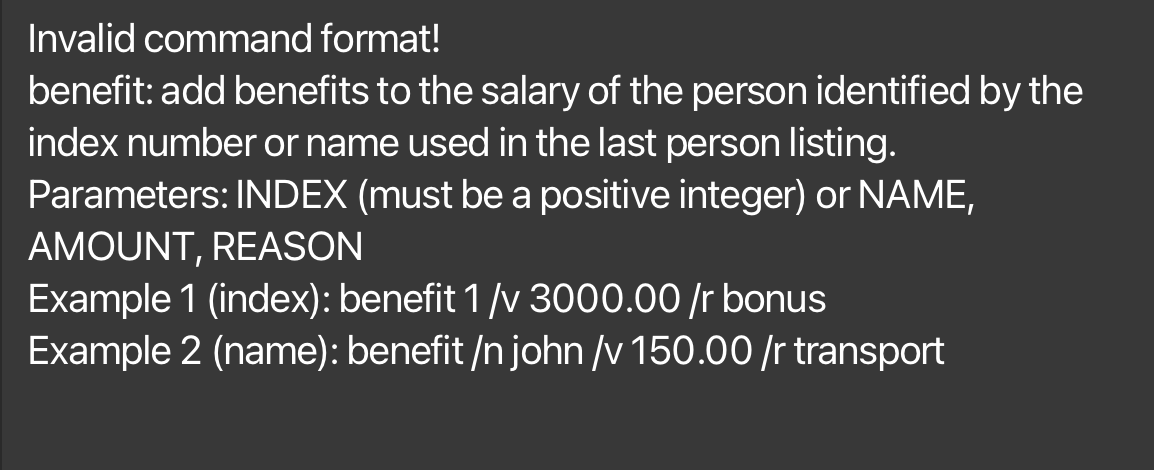
The employee index provided is invalid. - If the command is incorrect, the app should display the following message.
- If the
VALUEprovided is not in the correct format, the app should display the following message. Here it says that
 Payment should only contain unmerical digits.. This is because theVALUEfield refers to the amount of money to be added to the employee’s salary, which is aPayment. This also applies to theVALUEfield in thedeductcommand and theSALARYfield in theaddandeditcommand. - If the
REASONfield is missing, the app should display the following message.
- If the
REASONprovided is not supported (i.e. not one of the five reasons in the parameter formats), the app should display the following message.
-
If the
REASONprovided is not a valid one for a benefit, the app should display the following message.
- Go back to Table of Contents
Calculating an employee’s payroll: payroll
What it does
This feature allows users to calculate the payroll of an employee.
Command Format
payroll INDEX or payroll /n NAME
- Calculates the payroll of the employee specified by the
INDEXorNAME, where the payroll period is the current month. - The
INDEXrefers to the index number shown in the displayed employee list. - The
INDEXmust be a positive integer, and must be within the range of the list (Total number of employees in the current list displayed).
INDEX.
- The
NAMEmust be in the correct format.
SALARY) of an employee will only take effect from the next payroll period onwards, and it will only apply to the calculation of next payroll onwards.
E.g., If you edit the basic salary of an employee in January 2024, the basic salary will only be updated from the payroll period of February 2024 onwards.
Examples:
-
payroll 3calculates the payroll of the third employee in the most recently displayed list. -
payroll /n John Doecalculates the payroll of the employee named John Doe.
Output:
- ManaGease should display the payroll of the employee specified by the
INDEXorNAME, if the input is valid.
Possible Error Output:
- If the index is not within the numbers in the list, the app should display
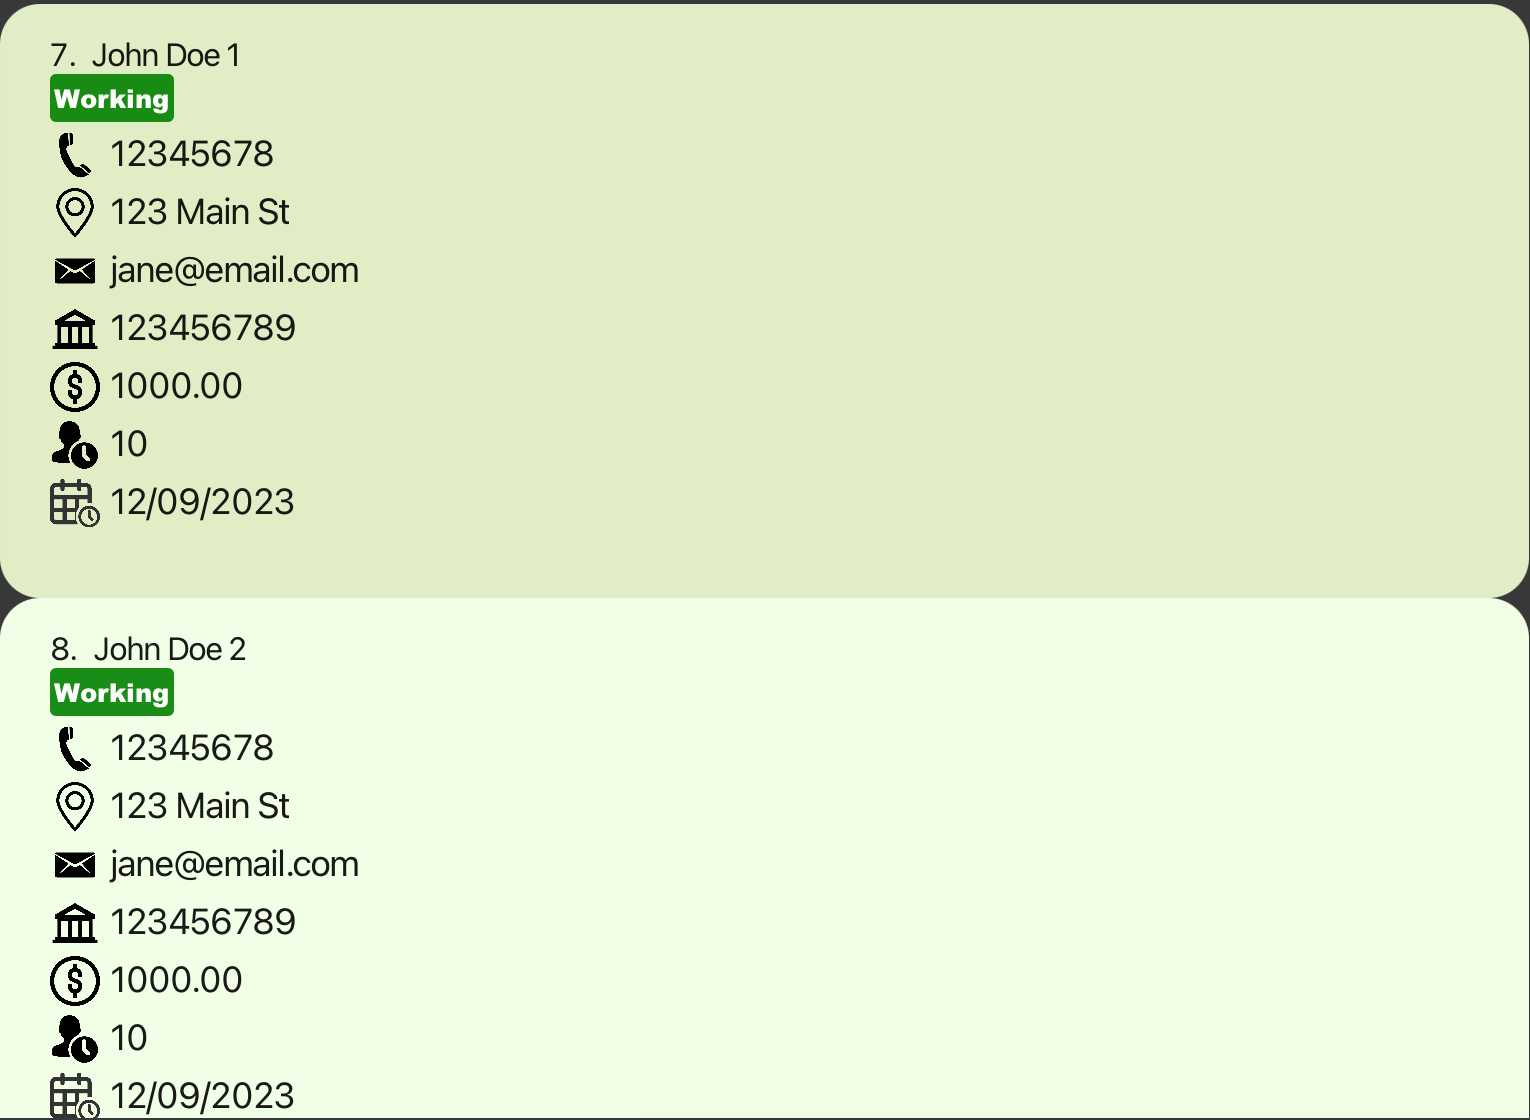
The employee index provided is invalid. - If there are more than one employee with the same name in the command, the app will display
x employees found! Refer to their indexes for payroll calculationand will list down those employees for the user to view. The user should then use their index numbers to calculate the payroll.
-
If the command is incorrect, the app should display the following message.

- Go back to Table of Contents
Generating payslips for an employee: payslip
What it does
This feature allows users to generate payslips for an employee.
Command Format
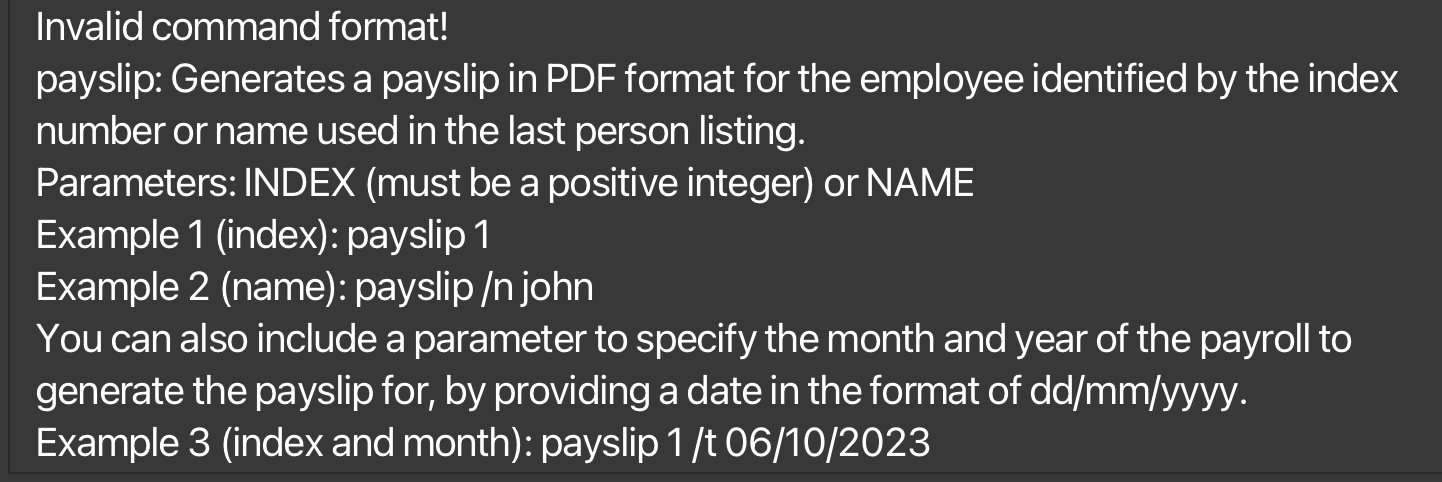
payslip INDEX [/t DATE] or payslip /n NAME [/t DATE]
- Generates a payslip based on the latest payroll for the employee specified by the
INDEXorNAME. - If the optional
/t DATEis provided, the payslip will be generated for the month specified by the date. - The
INDEXrefers to the index number shown in the displayed employee list. - The
INDEXmust be a positive integer, and must be within the range of the list (Total number of employees in the current list displayed).
INDEX.
- The
NAMEmust be in the correct format. - The optional
DATEmust be inDD/MM/YYYYformat, e.g.01/01/2024.
SALARY) of an employee will only take effect from the next payslip period onwards, and it will only apply to the generation of next payslip onwards.
E.g., If you edit the basic salary of an employee in January 2024, the basic salary will only be updated from the payslip period of February 2024 onwards.
Examples:
-
payslip 3generates a payslip based on the latest payroll for the third employee in the most recently displayed list. -
payslip /n John Doegenerates a payslip based on the latest payroll for the employee named John Doe. -
payslip 3 /t 01/01/2024generates a payslip for the third employee in the most recently displayed list for the month of January 2024.
Output:
- ManaGease should display a success message saying that the payslip has been generated successfully, if the input is valid.

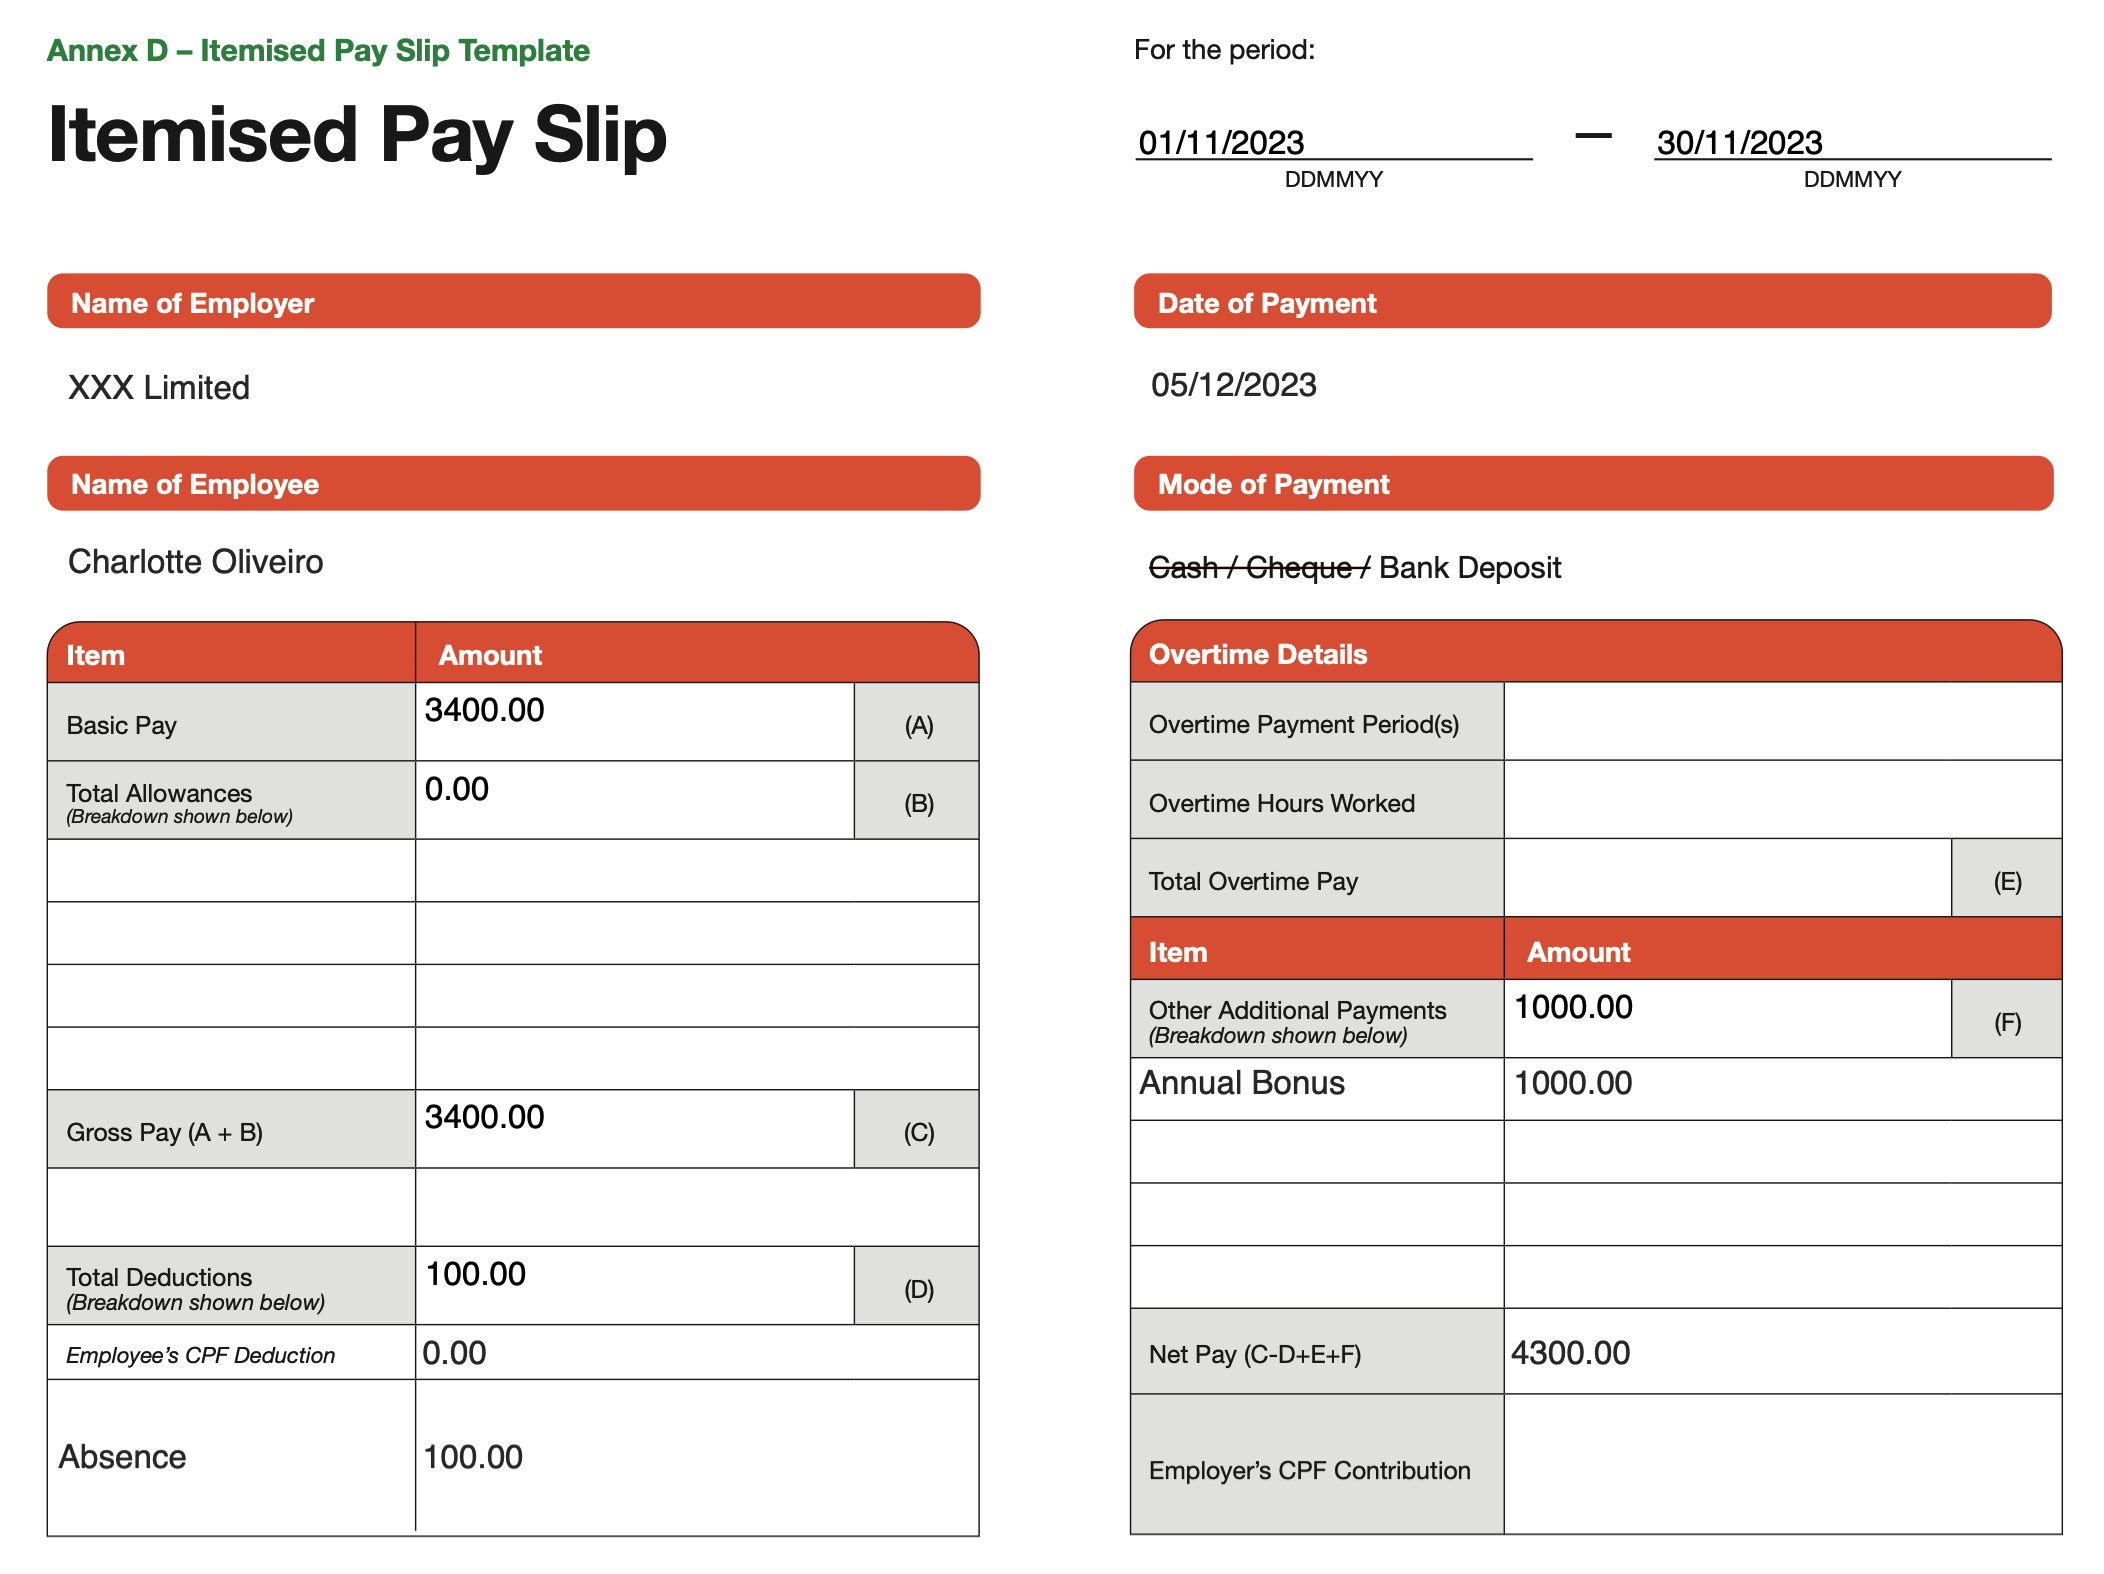
- A payslip report in PDF format will be generated in the
payslipsfolder in the ManaGease home directory.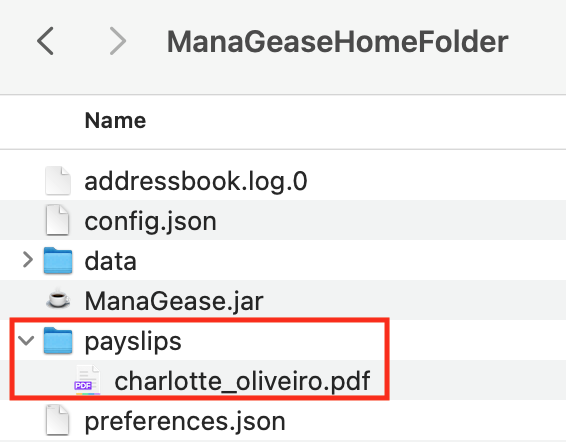
Possible Error Output:
- If the index is not within the numbers in the list, the app should display
The employee index provided is invalid. - If the command is incorrect, the app should display the following message.
-
If the date provided is not in the correct format, the app should display the following message.

- Go back to Table of Contents
Marking an employee’s attendance: mark
What it does
Marks the indicated employee as “Absent”, “Late”, or “Present”.
Command Format
mark INDEX /at Attendance_Type or mark /n NAME /at Attendance_Type
- The
INDEXrefers to the index number shown in the displayed employee list. - The
INDEXmust be a positive integer, and must be within the range of the list (Total number of employees in the current list displayed).
INDEX.
- The
NAMEmust be in the correct format. - The
Attendance_Typecan only be:ABSENT,LATE, orPRESENT. - It is case-insensitive. e.g. you can either enter ABSENT or absent.
Examples:
-
mark /n John /at Absentmarks John as absent. -
mark 1 /at Presentmarks the first employee in the current list to be present.
Output:
- If the command is successful, the app should display the following message. The employee’s attendance status should also be updated accordingly.


Possible Error Output:
- If the index is not within the numbers in the list, the app should display
The employee index provided is invalid. - If the command is incorrect, the app should display the following message.

-
If the ATTENDANCE_TYPE is not within the valid list, the app should display the following message.

- Go back to Table of Contents
View an employee’s attendance report: attendance
What it does
View employee’s attendance report.
Command Format
attendance INDEX or attendance /n NAME
- The
INDEXrefers to the index number shown in the displayed employee list. - The
INDEXmust be a positive integer, and must be within the range of the list (Total number of employees in the current list displayed).
INDEX.
- The
NAMEmust be in the correct format.
Examples:
-
attendance /n Johnviews John’s attendance report for the year up till today. -
attendance 1views the first employee’s attendance report for the year up till today.
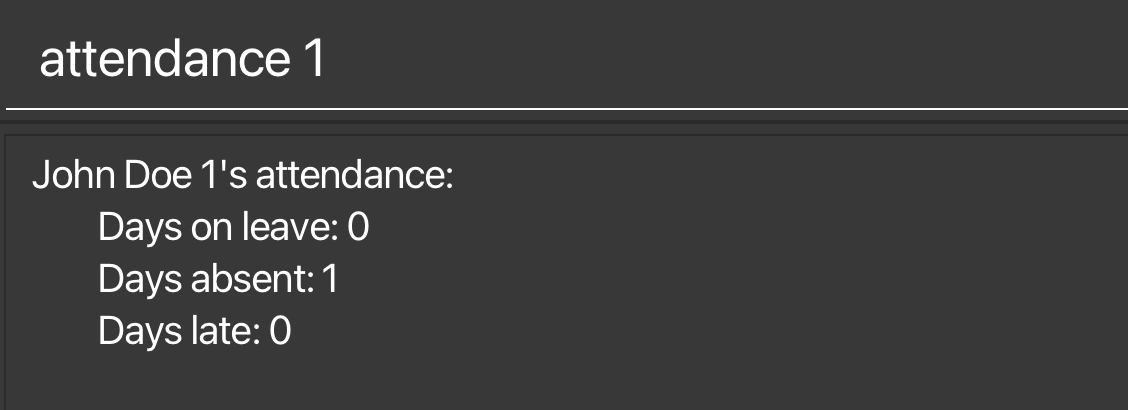
Output:
- If the command is successful, the app should display the attendance. The address book’s display of the employee’s attendance status should also be updated accordingly.
Possible Error Output:
- If the index is not within the numbers in the list, the app should display
The employee index provided is invalid. -
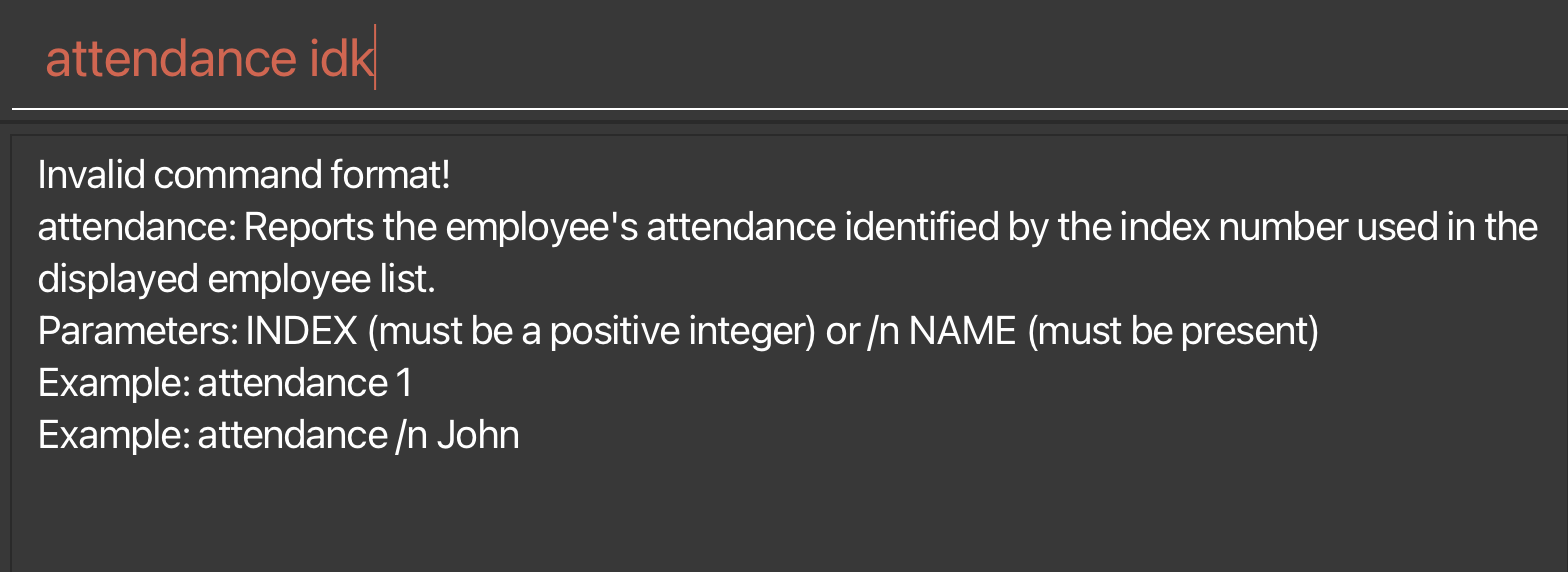
If the command is incorrect, the app should display the following message.
- Go back to Table of Contents
Listing all employees: list
What it does
Shows a list of all employees in the workplace.
Command format:
list
Output:
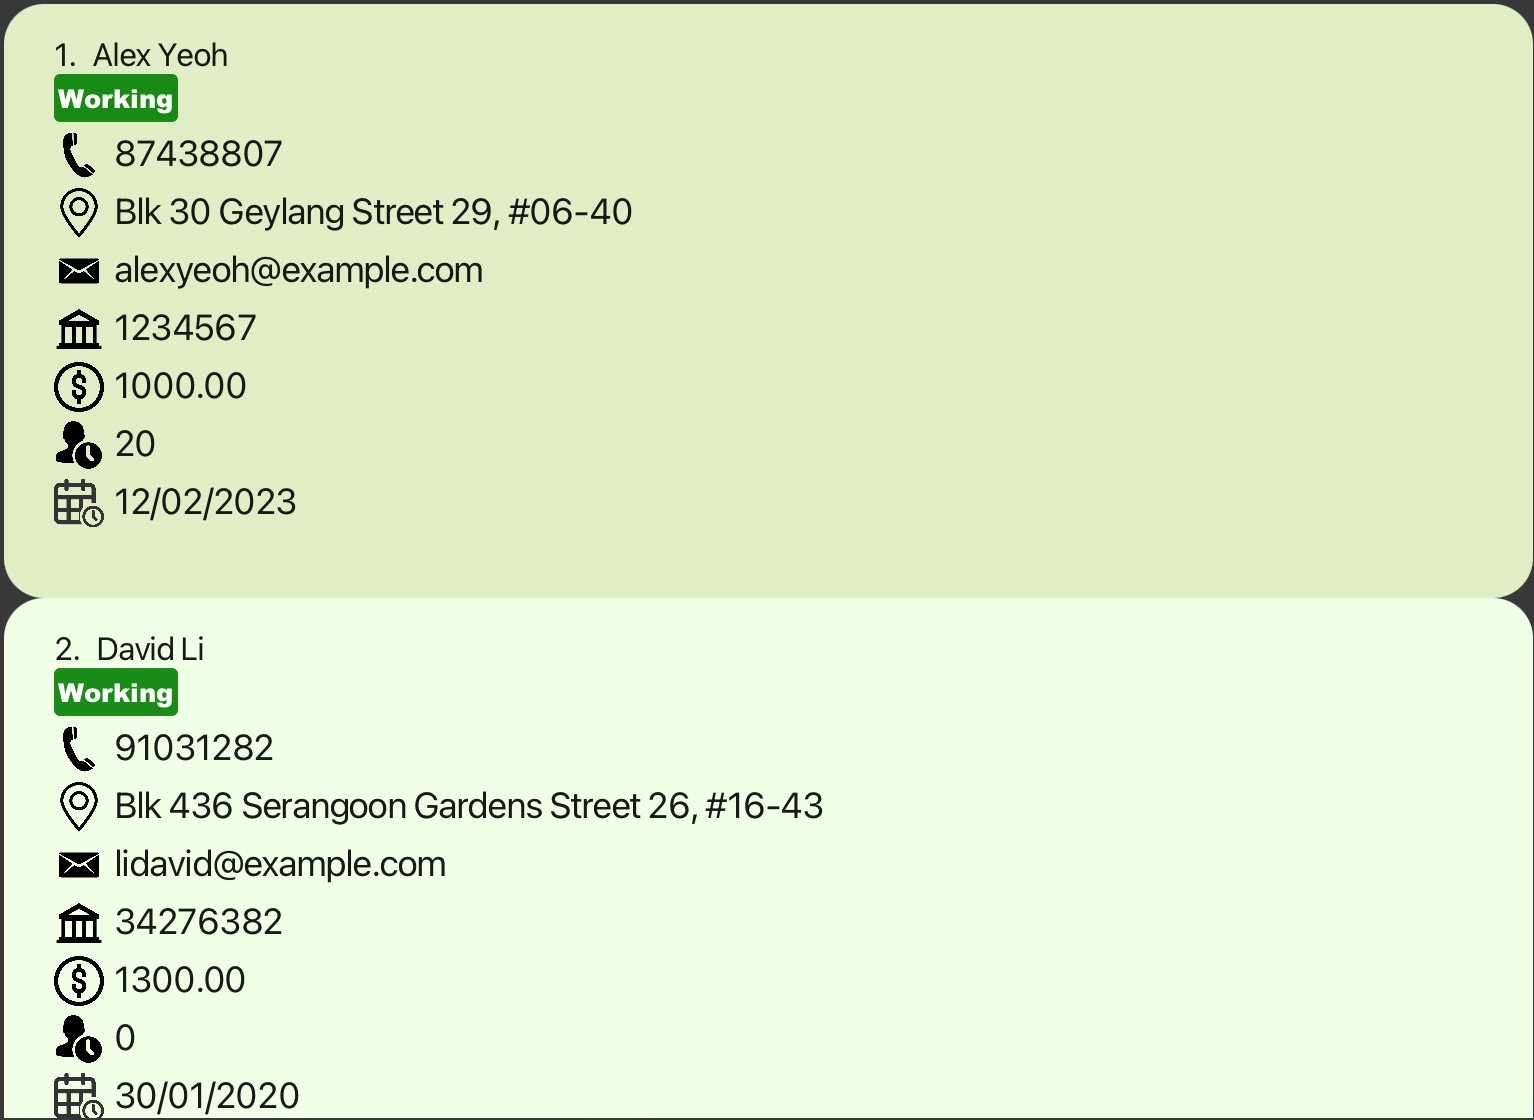
-
ManaGease should display a list of all employees in the workplace.

-
Go back to Table of Contents
Locating employees by name: find
What it does
Finds employees whose names contain any of the given keywords.
Command Format
find KEYWORD [MORE_KEYWORDS]
- The search is case-insensitive. e.g.
alexwill matchAlex - The order of the keywords does not matter. e.g.
Yeoh Alexwill matchAlex Yeoh - Only the name is searched.
- Only full words will be matched e.g.
Alewill not matchAlex - Employees matching at least one keyword will be returned (i.e.
ORsearch). e.g.Hans Bowill returnHans Gruber,Bo Yang
Example:
-
find alex davidreturnsAlex Yeoh,David Li


-
Go back to Table of Contents
Clearing all entries: clear
What it does
Clears all entries from the address book.
Command format:
clear
- Go back to Table of Contents
Exiting the program: exit
What it does
Exits the program.
Command format:
exit
- Go back to Table of Contents
Saving the data
Employee data are saved in the hard disk automatically after any command that changes the data. There is no need to save manually.
Editing the data file
ManaGease data are saved automatically as a JSON file [JAR file location]/data/employees.json. You are discouraged from editing the data file to make sure ManaGease works well to help you with your business.
FAQ
Q: How do I transfer my data to another Computer?
A: Install the app in the other computer and overwrite the empty data file it creates with the file that contains the data of your previous ManaGease home folder.
Q: I am using multiple screens. If I move the application to a secondary screen, and later switch to using only the primary screen, the GUI will open off-screen. What should I do?
A: Delete the preferences.json file created by the application before running the application again.
Q: Is internet access necessary for the application?
A: ManaGease doesn’t need internet access as the data are stored locally in your machine.
Glossary
| Term | Description |
|---|---|
| Benefit | Benefit are additional financial rewards provided to employees. |
| Deduction | Deductions refer to the removal of a specified amount from an employee’s salary. |
| Payslip | An itemised payslip generated based on payroll in pdf format. The template payslip is retrieved from Ministry of Manpower (MOM) website |
| Payroll | A report that show the net salary, basic pay, total deductions and total benefits in the result box. |
| Attendance report | A report that show the number of days on leave, absent and late for an employee in the result box. |
Command summary
| Action | Format and Examples |
|---|---|
| Add |
add /n NAME /e EMAIL /p PHONE /a ADDRESS /b BANK_ACCOUNT /jd JOIN_DATE /s SALARY /l ANNUAL_LEAVEe.g., add /n Jane Smith /e jane@email.com /p 12345678 /a 123 Main St /b 123456789 /jd 12/09/2023 /s 1000.00 /l 10
|
| Clear | clear |
| Delete |
delete INDEXe.g., delete 3
|
| Edit |
edit INDEX [/n NAME] [/e EMAIL] [/p PHONE] [/a ADDRESS] [/b BANK_ACCOUNT] [/jd JOIN_DATE] [/s SALARY] [/l ANNUAL_LEAVE]e.g., edit 2 /n James Lee e/jameslee@example.com
|
| Read |
read INDEX PREFIXe.g., read 3 /n
|
| List | list |
| Find |
find KEYWORD [MORE_KEYWORDS]e.g., find alex
|
| Deduct |
deduct INDEX /v VALUE /r REASON or deduct /n NAME /v VALUE /r REASONe.g., deduct 3 /v 200.00 /r cpf
|
| Benefit |
benefit INDEX /v VALUE /r REASON or benefit /n NAME /v VALUE /r REASONe.g., benefit 3 /v 1000.00 /r bonus
|
| Payroll |
payroll INDEX or payroll /n NAMEe.g., payroll 3
|
| Payslip |
payslip INDEX [/t DD/MM/YYYY] or payslip /n NAME [/t DD/MM/YYYY]e.g., payslip 3
|
| Add Leave |
addleave INDEX /on DATE or addleave INDEX /from DATE /to DATEe.g., addleave 3 /from 12/12/2024 /to 14/12/2024
|
| Delete Leave |
deleteleave INDEX /on DATE or deleteleave INDEX /from DATE /to DATEe.g., deleteleave 3 /from 12/12/2024 /to 14/12/2024
|
| View Leave |
viewleave /on DATEe.g., viewleave /on 12/12/2024
|
| View Previous Month | pm |
| View Current Month | cm |
| View Next Month | nm |
| Mark |
mark INDEX /at ATTENDANCE_TYPE or mark /n NAME /at ATTENDANCE_TYPEe.g, mark 3 /at present
|
| Attendance |
attendance INDEX or attendance /n NAMEe.g, attendance 3
|
| Help | help |
| Exit | exit |
- Go back to Features
- Go back to Table of Contents